초보자를 위한 기본 WordPress 생성 CSS 치트 시트
게시 됨: 2022-08-05기본 WordPress 생성 CSS 치트 시트를 찾고 있습니까?
WordPress는 대부분의 테마에서 일부 CSS 클래스를 다른 요소에 자동으로 추가합니다. 이러한 기본 CSS 클래스를 사용하여 WordPress 테마에서 해당 요소의 스타일을 지정할 수 있습니다.
이 기사에서는 기본 WordPress 생성 CSS 치트 시트를 보여줍니다. 또한 CSS 클래스를 쉽게 찾는 방법과 필요할 때마다 사용자 정의 CSS 클래스를 추가하는 방법에 대해서도 설명합니다.
기본 WordPress 생성 CSS에 대해 배우는 이유는 무엇입니까?
WordPress는 자동으로 기본 CSS 클래스를 생성하고 WordPress 웹사이트의 다른 요소에 추가합니다.
그런 다음 WordPress 테마 개발자는 이러한 CSS 클래스를 사용하여 모든 WordPress 사이트의 공통 영역에 스타일을 지정할 수 있습니다. 여기에는 콘텐츠 영역, 사이드바, 위젯, 탐색 메뉴 등이 포함될 수 있습니다.
이러한 CSS 클래스를 아는 것은 WordPress 테마 개발을 배우거나 단순히 자신의 웹사이트에 대한 하위 테마를 만들려는 경우에 유용합니다.
또한 고유한 테마를 만들지 않고 사용자 정의 CSS를 추가하여 WordPress 테마의 특정 요소에 빠르게 스타일을 지정할 수 있습니다.
참고 : 테마 스타일을 변경하거나 사용자 정의 테마를 만들기 위해 CSS를 배울 필요는 없습니다. 코딩을 배우고 싶지 않다면 SeedProd와 같은 드래그 앤 드롭 빌더를 사용할 수 있습니다. 이 기사의 뒷부분에서 더 자세히 이야기하겠습니다.
즉, 기본 WordPress 생성 CSS 클래스를 살펴보겠습니다.
기본 바디 클래스 스타일
HTML의 본문 태그 <body> 에는 모든 웹 페이지의 전체 레이아웃 구조가 포함되어 있어 WordPress 테마 디자인에서 매우 중요합니다.
WordPress는 테마 디자이너가 본문 컨테이너의 스타일을 지정하는 데 사용할 수 있는 여러 CSS 클래스를 본문 영역에 추가합니다.
// Added when a website is using a right-to-left language e.g. Arabic, Hebrew
.rtl

// Added when home page is being displayed
.home

// Added when blog page is being displayed
.blog

// Added when an Archive page is being displayed
.archive

// Added when a date based archive is displayed
.date

// Added on search pages
.search

// Added when pagination is enabled
.paged

// Added when an attachment page is displayed
.attachment

// Added when a 404 error page is displayed
.error404

// Added when a single post is dispayed includes post ID
.single postid-(id)

// Added when a single attachment is displayed. Includes attachment ID
.attachmentid-(id)

// Added when a single attachment is displayed. Includes attachment mime-type
.attachment-(mime-type)

// Added when an author page is displayed
.author

// Added when an author page is displayed. Includes author name.
.author-(user_nicename)

// Added when a category page is displayed
.category

//Added when a category page is displayed. Includes category slug.
.category-(slug)

// Added when a tag page is displayed.
.tag

// Added when a tag page is displayed. Includes tag slug.
.tag-(slug)

// Added when a parent page is displayed.
.page-parent

// Added when a child page is displayed. Includes parent page ID.
.page-child parent-pageid-(id)

// Added when a page is displayed using page template. Includes page template file name.
.page-template page-template-(template file name)

// Added when search results are displayed.
.search-results

// Added when search returns no results.
.search-no-results

// Added when a logged in user is detected.
.logged-in

// Added when a paginated page is displayed. Includes page number.
.paged-(page number)

// Added when a paginated single item is displayed. Includes page number.
.single-paged-(page number)

// Added when a paged page type is displayed. Includes page number.
.page-paged-(page number)

// Added when a paged category page is displayed. Includes page number.
.category-paged-(page number)

// Added when a paged tag page is displayed. Includes page number.
.tag-paged-(page number)

//Added when a paged date based archive page is displayed. Includes page number.
.date-paged-(page number)

// Added when a paged author page is displayed. Includes page number.
.author-paged-(page number)

// Added when a paaged search page is displayed. Includes page number.
.search-paged-(page number)
보시다시피 이러한 클래스에는 CSS 스타일에서 대상으로 지정할 수 있는 다양한 조건이 포함되어 있습니다.
예를 들어, '뉴스' 카테고리 페이지의 배경색을 다르게 하고 싶다면 다음 사용자 정의 CSS를 추가할 수 있습니다.
.category-news
background-color:#f7f7f7;
기본 포스트 스타일 클래스
body 요소와 마찬가지로 WordPress는 post 요소에도 동적 클래스를 추가합니다.
이 요소는 일반적으로 테마 템플릿의 <article> 태그입니다. 그러나 테마에 따라 다른 태그가 될 수 있습니다. 포스트 CSS 클래스는 post_class() 템플릿 태그를 추가하여 테마에 표시됩니다.
<article id="post-<?php the_ID(); ?>" <?php post_class(); ?>>
다음은 post_class() 함수에 의해 생성되는 가장 일반적인 CSS 클래스 목록입니다.
// Adds a class with ID for single items
.post-(ID)

// Generic post claass added for single blog posts.
.post

// Generic page class added when a single page is displayed.
.page

// Generic attachment class added to attachment pages.
.attachment

// Adds a post type class e.g. type-post
.type(post-type)

// Adds a class for post format if theme supports posts formats. E.g. format-standard
.format-(post-format)

// Added when an item has a featured image
.has-post-thumbnail

// Added when a sticky post is displayed
.sticky

// Generic class to display an entry
.hentry

// Classes with categories assigned to a post. E.g. category-news category-movies
.category-(slug)

// Classes with tags assigned to a post. e.g. tag-photofriday tag-tgif
.tag-(slug)
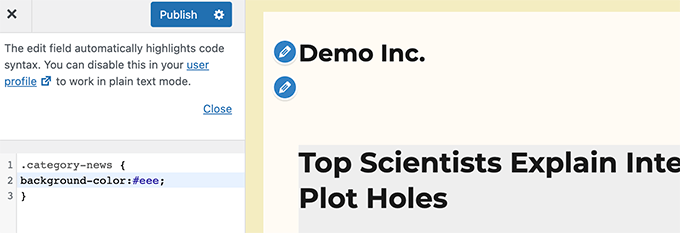
포스트 클래스를 사용하면 다양한 조건에 맞는 블로그 포스트와 페이지의 스타일을 지정할 수 있습니다. 예를 들어 다음 사용자 정의 CSS를 사용하여 특정 카테고리에 보관된 블로그 게시물의 스타일을 다르게 지정할 수 있습니다.
 .category-news
background-color:#EFEFEF;
WordPress 대시보드에 CSS 편집기가 표시되지 않으면 누락된 WordPress 테마 사용자 지정 프로그램을 수정하는 방법에 대한 자습서를 따르세요.
기본 탐색 메뉴 클래스
WordPress는 탐색 메뉴에 CSS 클래스도 추가합니다. 다음은 기본적으로 탐색 메뉴에 추가되는 기본 클래스입니다.
 // Class for Current Page
.current_page_item

// Class for Current Category
.current-cat

// Class for any other current Menu Item
.current-menu-item

 // Class for a taxonomies
.menu-item-type-(taxonomy)

// class to distinguish post types.
.menu-item-type-(post_type)

// Class for any custom item that you added
.menu-item-type-custom

// Class for the Home Link
.menu-item-home
WordPress 테마는 또한 각 탐색 메뉴 위치에 CSS 클래스를 추가합니다.
테마가 헤더 영역 내부의 메뉴 위치에 기본 메뉴 클래스를 할당한다고 가정해 보겠습니다. 그러면 다음 CSS 클래스를 사용하여 CSS에서 이를 대상으로 지정할 수 있습니다.
// container class
#header .primary-menu

// container class first unordered list
#header .primary-menu ul

//unordered list within an unordered list
#header .primary-menu ul ul

 // each navigation item
#header .primary-menu li

// each navigation item anchor
#header .primary-menu li a

// unordered list if there is drop down items
#header .primary-menu li ul

// each drop down navigation item
#header .primary-menu li li

// each drap down navigation item anchor
#header .primary-menu li li a
자세한 내용은 WordPress에서 탐색 메뉴의 스타일을 지정하는 방법에 대한 가이드를 참조하세요.
기본 WordPress 위젯 클래스
위젯을 사용하면 WordPress 테마에서 콘텐츠가 아닌 블록을 쉽게 표시할 수 있습니다. 일반적으로 WordPress 테마의 전용 위젯 준비 영역 또는 사이드바에 표시됩니다.

WordPress는 레거시 위젯에 다음 클래스를 추가합니다.
.widget

#searchform
.widget_search
.screen-reader-text

.widget_meta
.widget_meta ul
.widget_meta ul li
.widget_meta ul li a

.widget_links
.widget_links ul
.widget_links ul li
.widget_links ul li a

.widget_archive
.widget_archive ul
.widget_archive ul li
.widget_archive ul li a
.widget_archive select
.widget_archive option

.widget_pages
.widget_pages ul
.widget_pages ul li
.widget_pages ul li a

.widget_links
.widget_links li:after
.widget_links li:before
.widget_tag_cloud
.widget_tag_cloud a
.widget_tag_cloud a:after
.widget_tag_cloud a:before

.widget_calendar
#calendar_wrap
#calendar_wrap th
#calendar_wrap td
#wp-calendar tr td
#wp-calendar caption
#wp-calendar a
#wp-calendar #today
#wp-calendar #prev
#wp-calendar #next
#wp-calendar #next a
#wp-calendar #prev a

.widget_categories
.widget_categories ul
.widget_categories ul li
.widget_categories ul ul.children
.widget_categories a
.widget_categories select
.widget_categories select#cat
.widget_categories select.postform
.widget_categories option
.widget_categories .level-0
.widget_categories .level-1
.widget_categories .level-2
.widget_categories .level-3

.recentcomments
#recentcomments
#recentcomments li
#recentcomments li a
.widget_recent_comments

.widget_recent_entries
.widget_recent_entries ul
.widget_recent_entries ul li
.widget_recent_entries ul li a

.textwidget
.widget_text
.textwidget p
그러나 WordPress가 블록 기반 위젯 영역으로 이동함에 따라 이제 위젯 영역에 다른 블록을 추가할 수 있으며 각 블록은 동적으로 CSS 클래스를 생성합니다.
이 기사의 뒷부분에서 이러한 CSS 클래스를 찾는 방법을 보여드리겠습니다.
기본 주석 양식 클래스
댓글은 많은 WordPress 웹사이트의 참여 허브입니다. 스타일을 지정하면 사용자에게 보다 깔끔하고 매력적인 경험을 제공하는 데 도움이 됩니다.
워드프레스는 테마 개발자의 스타일 코멘트 영역을 돕기 위해 다음과 같은 기본 CSS 클래스를 추가합니다.
/*Comment Output*/

.commentlist .reply
.commentlist .reply a

.commentlist .alt
.commentlist .odd
.commentlist .even
.commentlist .thread-alt
.commentlist .thread-odd
.commentlist .thread-even
.commentlist li ul.children .alt
.commentlist li ul.children .odd
.commentlist li ul.children .even

.commentlist .vcard
.commentlist .vcard cite.fn
.commentlist .vcard span.says
.commentlist .vcard img.photo
.commentlist .vcard img.avatar
.commentlist .vcard cite.fn a.url

.commentlist .comment-meta
.commentlist .comment-meta a
.commentlist .commentmetadata
.commentlist .commentmetadata a

.commentlist .parent
.commentlist .comment
.commentlist .children
.commentlist .pingback
.commentlist .bypostauthor
.commentlist .comment-author
.commentlist .comment-author-admin

.commentlist
.commentlist li
.commentlist li p
.commentlist li ul
.commentlist li ul.children li
.commentlist li ul.children li.alt
.commentlist li ul.children li.byuser
.commentlist li ul.children li.comment
.commentlist li ul.children li.depth-id
.commentlist li ul.children li.bypostauthor
.commentlist li ul.children li.comment-author-admin

#cancel-comment-reply
#cancel-comment-reply a

/*Comment Form */

#respond
#reply-title
#cancel-comment-reply-link
#commentform
#author
#email
#url
#comment
#submit
.comment-notes
.required
.comment-form-author
.comment-form-email
.comment-form-url
.comment-form-comment
.form-allowed-tags
.form-submit
자세한 내용은 WordPress에서 주석 스타일 지정 방법에 대한 가이드를 참조하세요.
WordPress 블록 클래스 찾기
WordPress 블록 편집기는 블록에 대한 CSS 클래스를 동적으로 생성합니다.
이러한 CSS 클래스를 찾으려면 해당 특정 블록을 게시물이나 페이지에 추가해야 합니다. 그런 다음 미리보기 버튼을 클릭하여 블록이 작동하는지 확인해야 합니다.
미리보기 탭에서 방금 추가한 블록으로 마우스를 가져간 다음 마우스 오른쪽 버튼을 클릭하여 검사 도구를 선택합니다.
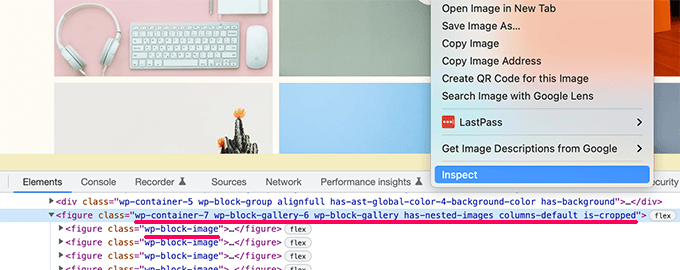
개발자 콘솔에서 블록에 의해 생성된 HTML을 볼 수 있습니다. 여기에서 블록에 의해 추가된 CSS 클래스를 볼 수 있습니다.
위의 스크린샷에서 우리는 Gallery 블록의 CSS 클래스를 보고 있습니다. 그런 다음 이러한 CSS 클래스를 사용하여 WordPress 테마에서 갤러리 블록의 스타일을 지정할 수 있습니다.
WordPress에 사용자 정의 CSS 클래스 추가하기
이제 기본 WordPress CSS 클래스는 매우 포괄적입니다. 그러나 그들의 목적은 주로 테마 개발자에게 빌드할 표준화된 프레임워크를 제공하는 것입니다.
개별 웹사이트의 경우 타겟팅할 기본 CSS 클래스를 찾을 수 없는 영역에 대해 사용자 정의 CSS를 추가해야 할 수 있습니다.
마찬가지로 전체 테마에 적용하지 않고 특정 게시물이나 페이지를 약간만 변경하고 싶을 때가 있습니다.
운 좋게도 WordPress는 다양한 영역에 CSS 클래스를 추가하는 몇 가지 쉬운 방법을 제공합니다.
블록 편집기 내에서 블록에 사용자 정의 CSS 클래스 추가
특정 게시물이나 페이지에 사용자 정의 CSS 클래스를 빠르게 추가하려는 경우 가장 쉬운 방법은 블록 편집기를 사용하는 것입니다.
게시물 또는 페이지를 편집한 다음 사용자 정의 CSS 클래스를 추가하려는 블록을 선택하기만 하면 됩니다. 블록 설정에서 고급 패널을 클릭하고 CSS 클래스의 이름을 추가합니다.
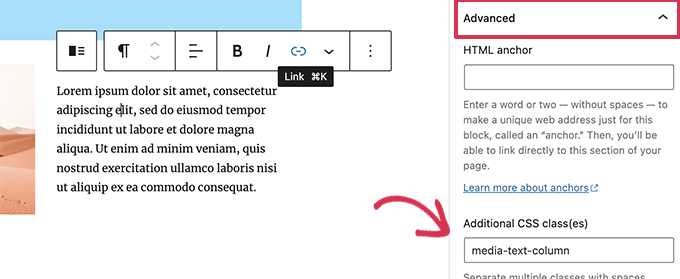
업데이트 버튼을 클릭하여 변경 사항을 저장하는 것을 잊지 마십시오.
이제 이 클래스를 사용하여 이 특정 게시물 또는 페이지의 이 특정 블록에만 영향을 주는 사용자 정의 CSS 코드를 추가할 수 있습니다.
WordPress 탐색 메뉴에서
WordPress 탐색 메뉴 항목에 사용자 정의 CSS를 추가할 수도 있습니다. 메뉴 항목을 버튼으로 변환하려는 경우 이 방법이 유용합니다.
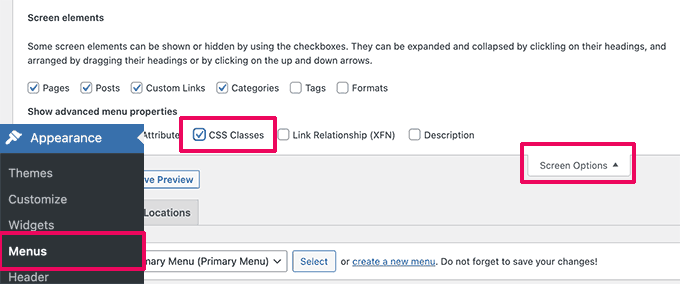
모양 » 메뉴 페이지로 이동하여 화면 오른쪽 상단 모서리에 있는 화면 옵션 버튼을 클릭하기만 하면 됩니다.
여기에서 CSS 클래스 옵션 옆의 확인란을 선택해야 합니다.
다음으로 아래로 스크롤하여 사용자 정의 CSS 클래스를 추가할 메뉴 항목을 클릭하여 확장해야 합니다.
CSS 클래스라는 레이블이 지정된 필드를 볼 수 있습니다. 계속해서 여기에 사용자 정의 CSS 클래스를 추가하십시오.
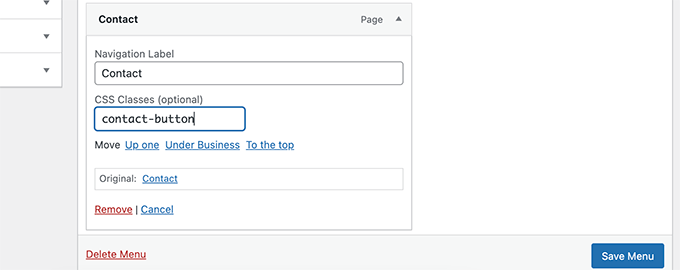
변경 사항을 저장하려면 메뉴 저장 버튼을 클릭하는 것을 잊지 마십시오.
이제 이 사용자 정의 CSS 클래스를 사용하여 특정 메뉴 항목의 스타일을 다르게 지정할 수 있습니다.
보너스: CSS 코드를 작성하지 않고도 WordPress 테마를 쉽게 디자인할 수 있습니다.
사용자 정의 CSS로 WordPress 테마의 스타일을 지정하는 방법을 배우는 것은 매우 유용한 기술입니다. 그러나 일부 사용자는 CSS 코드를 작성하지 않고 WordPress 테마를 디자인하는 솔루션을 원할 수 있습니다.
이를 위해서는 SeedProd가 필요합니다. 코드를 작성하지 않고도 사용자 정의 테마를 쉽게 만들 수 있는 시장 최고의 WordPress 페이지 빌더 도구입니다.
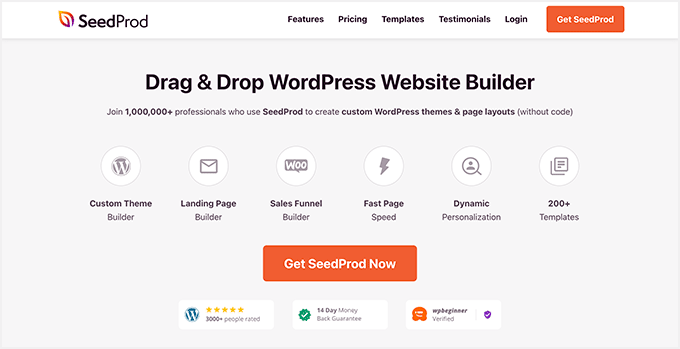
SeedProd는 시작점으로 사용할 수 있는 바로 사용할 수 있는 테마와 함께 제공됩니다.
템플릿을 수동으로 생성하여 처음부터 테마를 생성할 수도 있습니다.
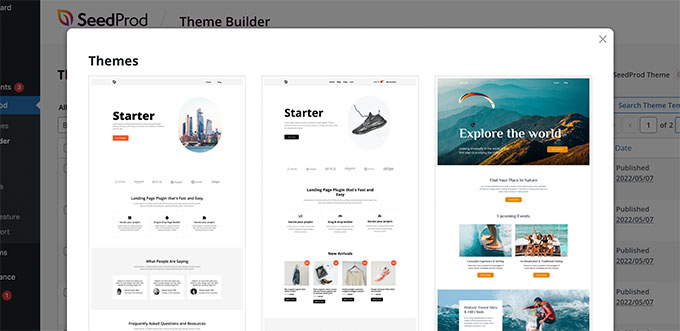
그런 다음 직관적인 드래그 앤 드롭 사이트 구축 인터페이스를 사용하여 사용자 정의 테마를 편집할 수 있습니다.
디자인에 블록을 놓기만 하면 자신만의 레이아웃을 만들 수 있습니다.
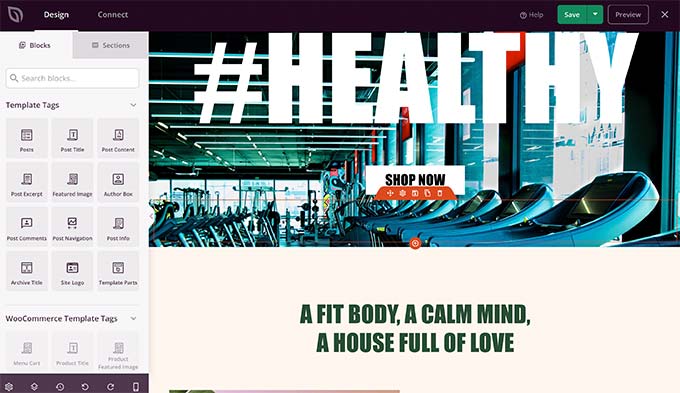
또한 간단한 포인트 앤 클릭으로 모든 항목을 쉽게 변경할 수 있습니다. 자신의 색상, 배경, 글꼴 등을 사용할 수 있습니다.
자세한 내용은 코드를 작성하지 않고 사용자 지정 WordPress 테마를 쉽게 만드는 방법에 대한 단계별 자습서를 참조하십시오.
이 기사가 기본 WordPress 생성 CSS 치트 시트를 찾는 데 도움이 되었기를 바랍니다. 가장 일반적인 WordPress 오류 수정에 대한 가이드를 보거나 소규모 비즈니스를 위한 최고의 라이브 채팅 소프트웨어에 대한 전문가 비교를 볼 수도 있습니다.
이 기사가 마음에 들면 WordPress 비디오 자습서용 YouTube 채널을 구독하십시오. Twitter와 Facebook에서도 찾을 수 있습니다.
