如何在 WordPress 中使表頭黏性:逐步指南
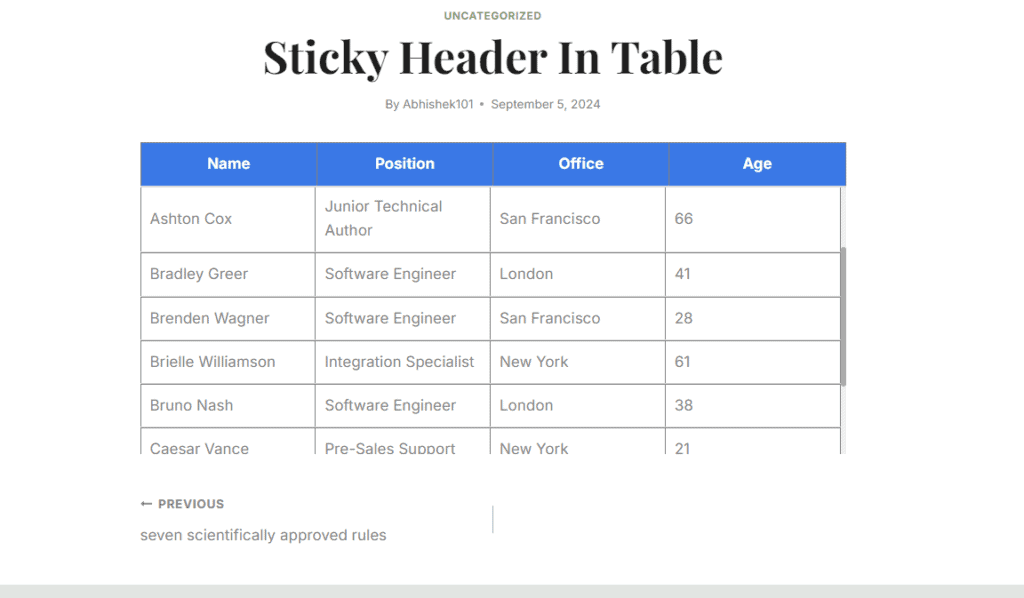
已發表: 2024-09-05在本文中,您將了解如何使預設 WordPress 表塊的標題部分具有黏性。
當您想要在表格中添加大量資料時,會佔用網頁上的大量空間,而讀者很難檢查同一頁面上的其他元素。因此,我們沒有顯示一個長表,而是添加一個可滾動的表,並將標題部分粘在頂部。
這樣,表格將佔用有限的空間,您可以添加任意數量的行,而不必擔心前端的表格大小。
這非常適合在網站上顯示長資料庫表。
那麼,讓我們看看如何在 WordPress 表格中建立固定標題。
為此,您需要在您的網站上添加幾行 CSS 程式碼。您可以使用程式碼管理器外掛程式為某些貼文類型或單一頁面載入 css,也可以使用主題自訂器中的其他 CSS 選項全域載入 css。
您可以關注影片以了解更多相關資訊。
Wordpress 表中的黏性標題程式碼
.scrollable-table-container { overflow: hidden; } .wp-block-table { width: 100%; border-collapse: collapse; } .wp-block-table tbody { display: block; max-height: 300px; overflow-y: auto; } .wp-block-table thead, .wp-block-table tr { display: table; width: 100%; table-layout: fixed; } /* Sticky table headers */ .wp-block-table thead th { position: sticky; top: 0; background: #3a78e6; Color:white; z-index: 10; padding: 10px; border-bottom: 2px solid #ddd; } .wp-block-table thead { border-bottom: 0px solid; } .wp-block-table tbody tr td { padding: 10px; border-bottom: 1px solid #ddd; } .wp-block-table tbody::-webkit-scrollbar { width: 6px; } .wp-block-table tbody::-webkit-scrollbar-thumb { background-color: #aaa; border-radius: 10px; } .wp-block-table tbody::-webkit-scrollbar-track { background-color: #f1f1f1; }
在這裡,正如您在上表中看到的,我們添加了 300 像素的高度,但如果我們保留普通表格,那麼它可能會在頁面上佔用 700 像素或更高的高度。 (根據表數據)
因此,您可以在此處設定固定高度,然後使用者可以捲動表格並讀取整個表格資料。此表格具有完全響應能力,並且在桌上型電腦、平板電腦和行動裝置上效果最佳。
您也可以關注這篇關於如何在 Blogger 和 WordPress 中新增響應式 HTML 表的文章。
您也可以透過修改 CSS 程式碼來更改標題背景顏色和文字顏色,如影片中所示。
要在 Blogger 中新增類似的黏性標題表,您可以使用以下程式碼。
<div class="table-container"> <table class="sticky-header-table"> <thead> <tr> <th>Header 1</th> <th>Header 2</th> <th>Header 3</th> </tr> </thead> <tbody> <tr> <td>Item 1</td> <td>Item 2</td> <td>Item 3</td> </tr> <tr> <td>Item 1</td> <td>Item 2</td> <td>Item 3</td> </tr> <tr> <td>Item 1</td> <td>Item 2</td> <td>Item 3</td> </tr> <tr> <td>Item 1</td> <td>Item 2</td> <td>Item 3</td> </tr> <tr> <td>Item 1</td> <td>Item 2</td> <td>Item 3</td> </tr> <tr> <td>Item 1</td> <td>Item 2</td> <td>Item 3</td> </tr> <tr> <td>Item 1</td> <td>Item 2</td> <td>Item 3</td> </tr> <tr> <td>Item 1</td> <td>Item 2</td> <td>Item 3</td> </tr> <tr> <td>Item 1</td> <td>Item 2</td> <td>Item 3</td> </tr> <tr> <td>Item 1</td> <td>Item 2</td> <td>Item 3</td> </tr> </tbody> </table> </div> <style> .table-container { max-height: 300px; overflow-y: auto; overflow-x: auto; /* Enable horizontal scrolling */ border: 1px solid #ddd; padding: 0; margin: 0; -webkit-overflow-scrolling: touch; } .table-container::-webkit-scrollbar { width: 6px; height: 6px; } .table-container::-webkit-scrollbar-thumb { background-color: #aaa; border-radius: 10px; } .table-container::-webkit-scrollbar-track { background-color: #f1f1f1; } .sticky-header-table { width: 100%; border-collapse: collapse; table-layout: auto; min-width: 600px; } .sticky-header-table thead th { position: sticky; top: 0; background: #e64141; Color: white; z-index: 10; border-bottom: 2px solid #000; padding: 10px; text-align: left; box-sizing: border-box; } .sticky-header-table tbody tr td { padding: 10px; box-sizing: border-box; word-wrap: break-word; } /* Responsive adjustments */ @media (max-width: 600px) { .table-container { overflow-x: auto; } .sticky-header-table { width: 100%; min-width: 600px; } .sticky-header-table thead th, .sticky-header-table tbody tr td { padding: 5px; } } </style>您所要做的就是更改表格資料並新增至貼文或頁面的 HTML 部分。


