如何在 WordPress 中顯示您的 Google、Facebook 和 Yelp 評論
已發表: 2023-02-10您想在 WordPress 中顯示 Google、Facebook 或 Yelp 評論嗎?
客戶評論鼓勵人們信任您的網站並從您的企業購買。 有很多第三方網站可以讓潛在客戶看到您的評論,但在您自己的網站上展示這些內容也是個好主意。
在本文中,我們將向您展示如何在您的 WordPress 網站中顯示來自 Google、Facebook 和 Yelp 的商業評論。

為什麼你應該在 WordPress 中顯示商業評論
有許多不同的網站可供客戶評論您的公司,例如 Google、Yelp 和 Facebook。 但是,潛在客戶需要訪問這些第三方網站才能看到評論。
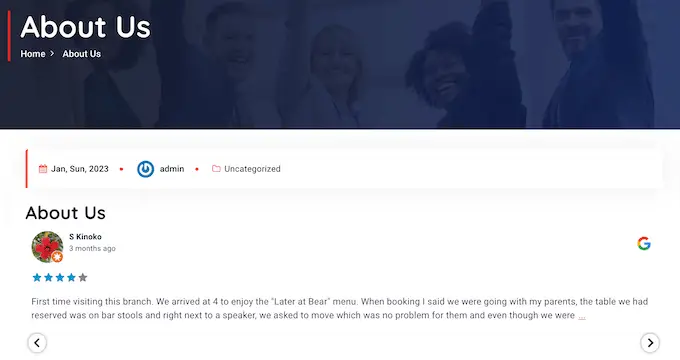
話雖如此,將 Google、Yelp 和 Facebook 評論添加到您的 WordPress 網站是個好主意,這樣每個人都可以看到它們。 例如,您可能會在 WooCommerce 產品頁面或關於我們頁面上顯示正面評價。
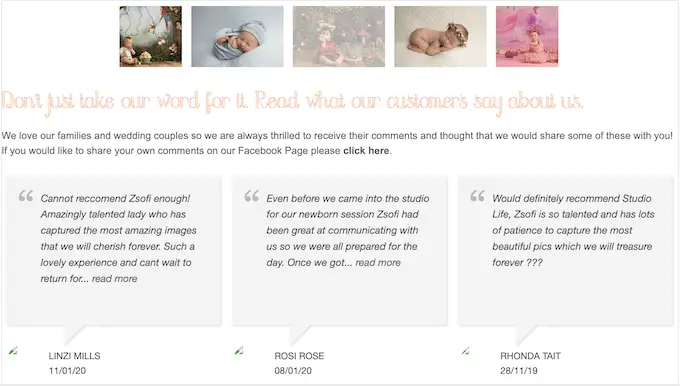
這些評論可以說服客戶信任您的公司,即使他們以前沒有從您那裡購買過產品。
您甚至可以使用評論來降低您的購物車放棄率,方法是將它們添加到您的自定義 WooCommerce 結帳頁面。
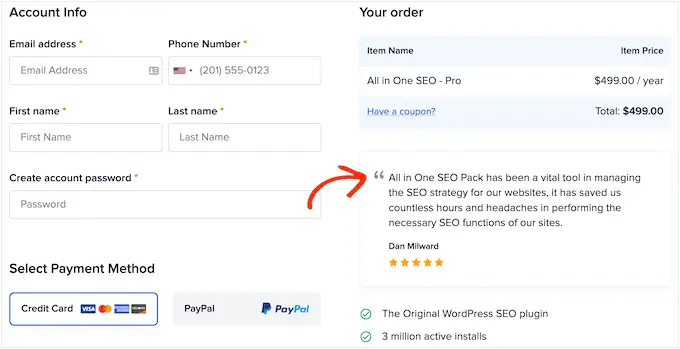
話雖如此,讓我們看看如何輕鬆地將 Yelp、Google 和 Facebook 評論添加到 WordPress。 只需使用下面的快速鏈接直接跳轉到您要使用的平台。
如何在 WordPress 中顯示 Google、Facebook 和 Yelp 評論
您可以簡單地將最佳評論複製並粘貼到您的網站,然後使用客戶評論插件顯示它們。 但是,根據您使用的插件,您可能需要手動添加新評論,這會花費大量時間和精力。
客戶在 Yelp 和 Facebook 等網站上發帖與這些評論出現在您的 WordPress 網站上之間也會有延遲。
考慮到這一點,最好創建一個使用 Reviews Feed Pro 插件自動更新的評論提要。
這個插件允許您顯示來自所有最大評論平台的評論。
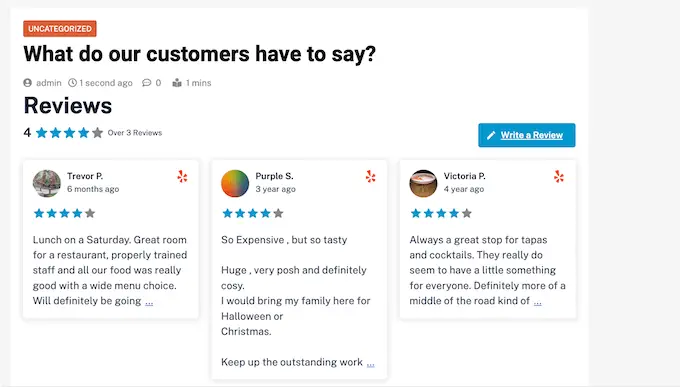
它還帶有預先設計的模板,因此您可以以不同的佈局顯示您的評論,包括展示、旋轉木馬、網格等。
評論提要會自動複製您網站的設計,因此評論看起來像是您網站的自然組成部分,而不是從其他平台嵌入的內容。
首先,您需要安裝並激活插件。 如果您需要幫助,請參閱我們關於如何安裝 WordPress 插件的指南。
激活後,單擊左側菜單中的Reviews Feed 。 然後您可以添加 Reviews Feed Pro 許可證密鑰並單擊“激活”按鈕。
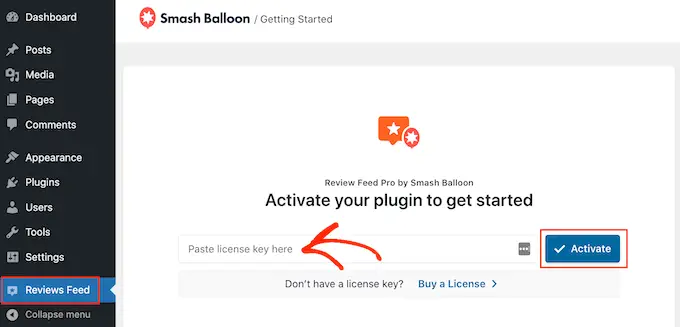
您可以在 Smash Balloon 網站上的帳戶下找到許可證密鑰。
激活插件後,您就可以顯示來自 Google、Facebook 或 Yelp 的評論。
方法 1.如何在 WordPress 中顯示 Yelp 評論
Yelp 是一個受歡迎的網站,訪問者可以在其中評論餐廳、品牌、服務、產品等。
如果您的企業已經有一些積極的 Yelp 評論,那麼將它們添加到您的網站可以為您帶來更多的銷售、會員、約會等。
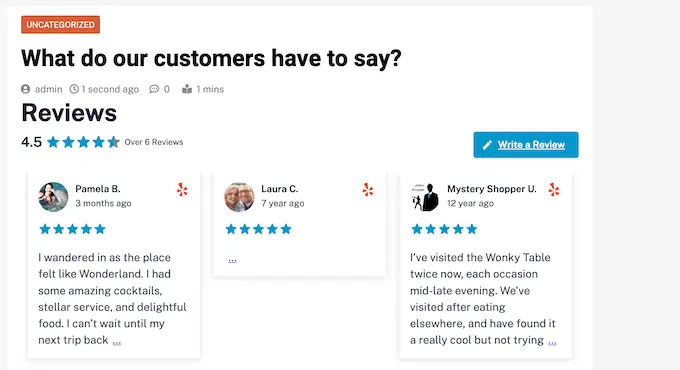
如果您還沒有 Yelp 帳戶,則可以聲明您的 Yelp 業務頁面。
由於 Yelp 是一個公共網站,您可以顯示來自任何擁有 Yelp 列表的企業的評論。 例如,如果您擁有一個商業列表博客或會員網站,那麼您可以在您的網站上顯示不同本地企業的 Yelp 評論。
要向您的網站添加評論,您需要創建一個 Yelp API 密鑰。 只需轉到 Yelp 開發人員頁面並輸入您的電子郵件地址。
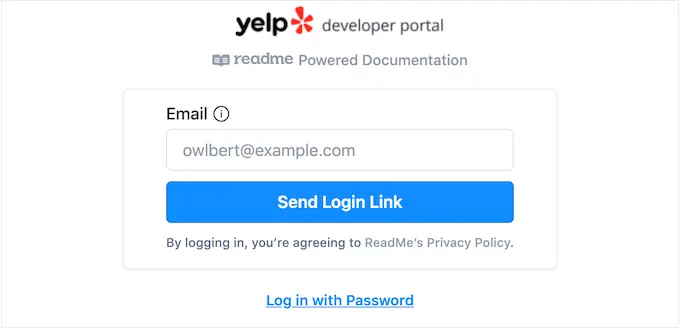
然後,單擊“發送登錄鏈接”按鈕。
注意:如果您還沒有帳戶,請轉到 Yelp 註冊頁面並按照屏幕上的說明進行註冊。
片刻之後,Yelp 將向您的電子郵件地址發送一個一次性登錄鏈接。 只需打開電子郵件並使用“點擊登錄”按鈕即可。
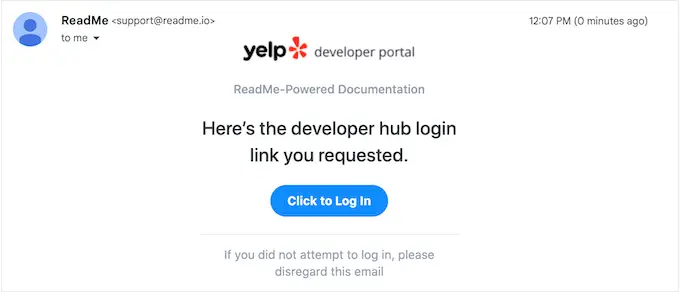
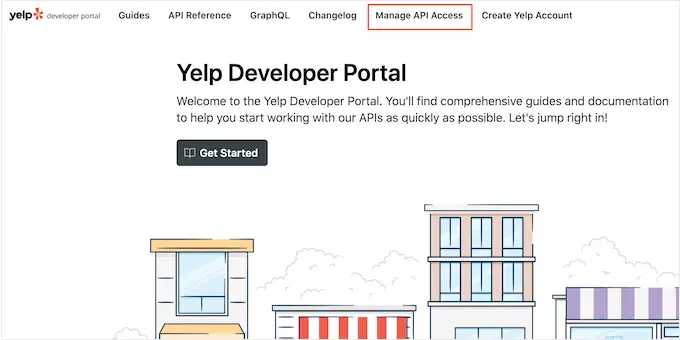
這會將您帶到 Yelp 開發人員門戶。
在工具欄中,單擊管理 API 訪問。
在此屏幕上,將您的 Yelp 應用程序的名稱輸入到“應用程序名稱”字段中。 這僅供您參考,因此您可以使用任何您想要的東西。
之後,打開“行業”下拉菜單並選擇最能反映您的網站或業務的行業。
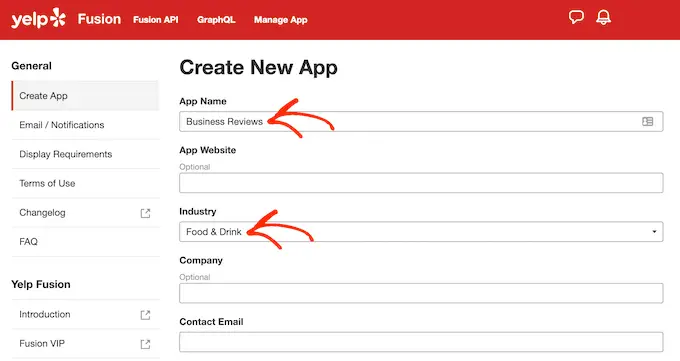
之後,輸入您的電子郵件地址並添加說明。
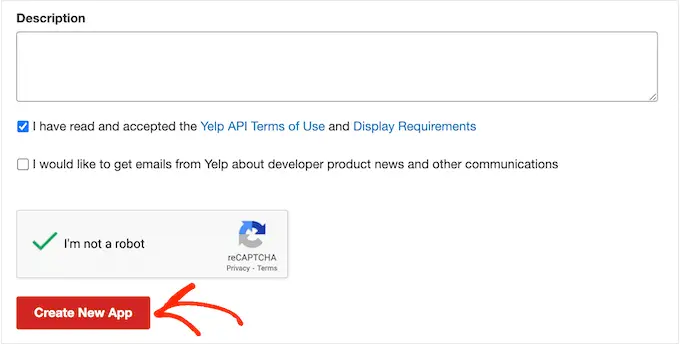
完成後,閱讀條款和條件。 如果您願意繼續,請選中條款和條件框,決定是否要從 Yelp 獲取電子郵件更新,並通過驗證碼。
最後,單擊“創建新應用程序”按鈕。
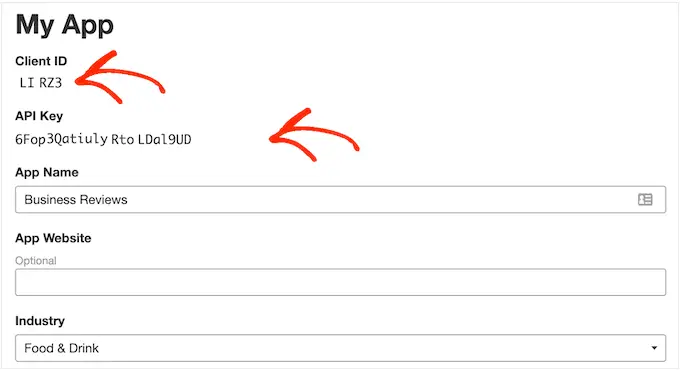
片刻之後,您會看到以下消息“很好,您的應用已創建! 在下面檢查您的應用程序 ID 和 API 密鑰。
您需要將此信息添加到您的 WordPress 網站。
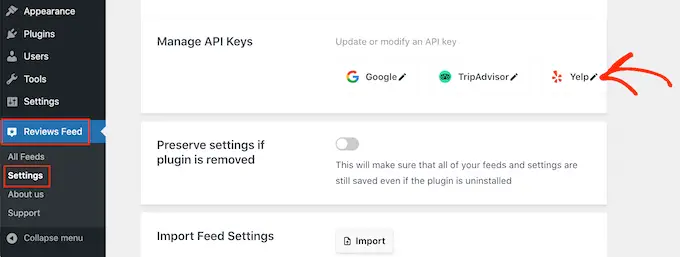
只需轉到 WordPress 儀表板中的評論提要 » 設置。
然後,滾動到“管理 API 密鑰”並單擊“Yelp”旁邊的小鉛筆圖標。
在彈出窗口中,添加您的 Yelp API 密鑰。
然後,單擊“添加”按鈕。
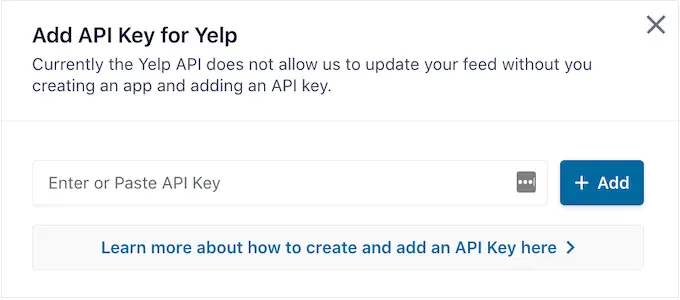
完成該設置後,您就可以將 Yelp 評論添加到您的網站了。
只需轉到評論提要»所有提要。 然後,單擊“添加新”按鈕。
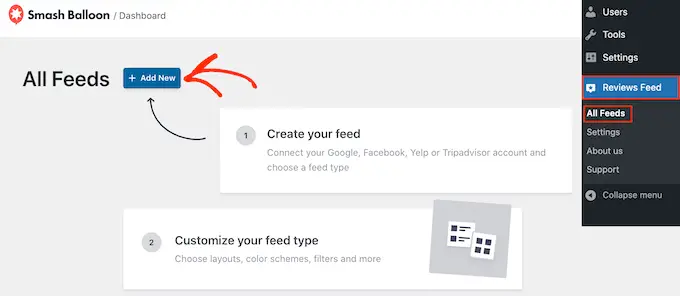
在下一個屏幕上,再次單擊“添加新”。
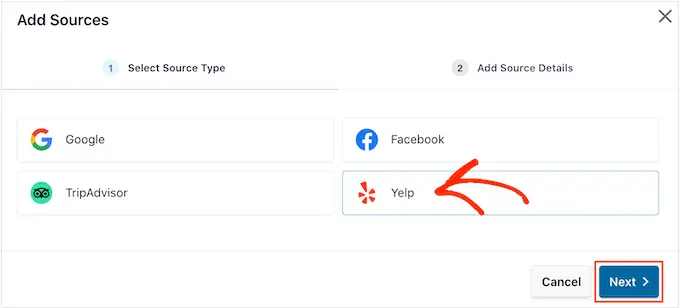
在出現的彈出窗口中,選擇“Yelp”,然後單擊“下一步”按鈕。
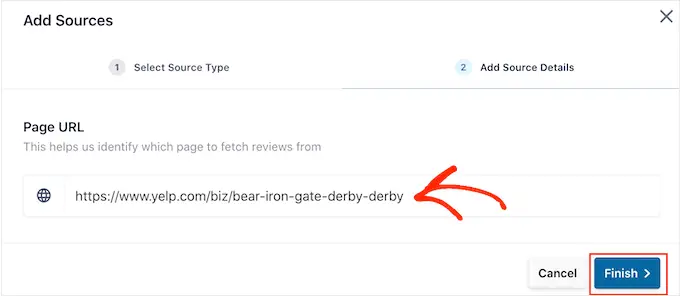
您現在可以添加要使用的 Yelp 頁面的 URL。 這可以是您擁有的頁面或任何公共第三方頁面。
之後,單擊“完成”。
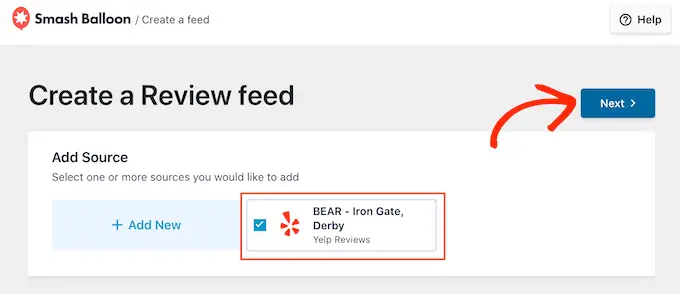
Smash Balloon 現在會將此 Yelp 頁面顯示為可能的來源。
要繼續創建提要,只需選中 Yelp 頁面旁邊的框,然後單擊“下一步”。
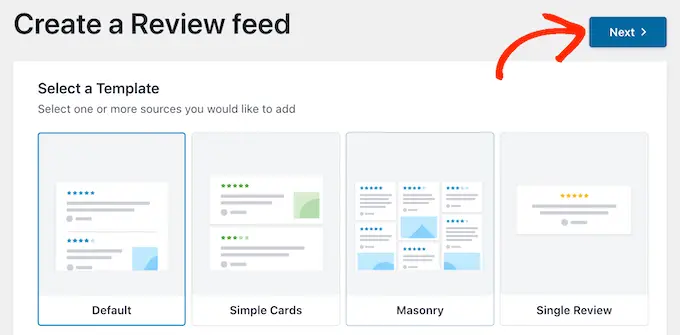
您現在可以選擇用於評論提要的模板,例如展示輪播、網格輪播,甚至是單個評論模板。
選擇設計後,單擊“下一步”按鈕。
Smash Balloon 現在將在其編輯器中顯示 Yelp 評論提要,供您進行微調。
有關如何自定義提要並將其添加到您的站點的說明,請跳至本指南的末尾。
方法 2.如何在 WordPress 中顯示谷歌評論
Google 評論是客戶可以在線評論您的業務的另一個地方。 再次強調,正面評價對於建立信任和獲得轉化很重要,但這些評價也會影響您的網站在搜索結果中的顯示位置。
大量積極的 Google 評論和高排名可能會提高您企業的搜索排名,尤其是在本地搜索結果中。
Google 還會在相關搜索引擎結果頁面上顯示您的評論。
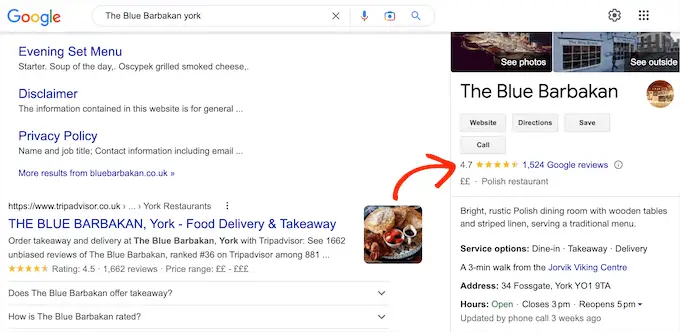
通過將這些評論添加到您的網站,您可以鼓勵人們訪問您的 Google 列表並給您留下正面評價。
這可能會改善您的 WordPress 搜索引擎優化和相關搜索引擎結果中出現的總體星級。
話雖如此,讓我們看看如何將 Google 評論添加到您的 WordPress 網站。
首先,您需要創建一個 Google API 密鑰,因此請轉到 Google 控制台並使用您的 Google 帳戶登錄。
登錄控制台後,點擊“Google Home”。
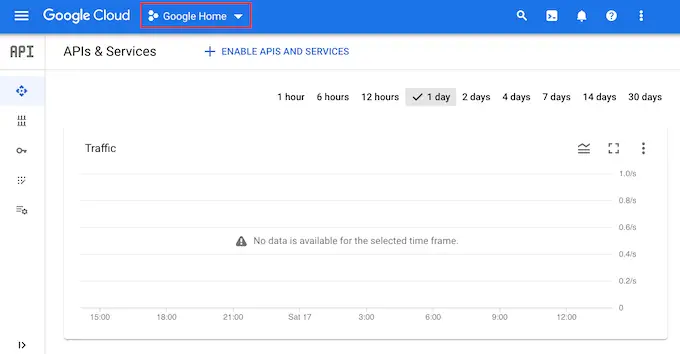
如果您是首次登錄 Google 控制台,則需要接受條款和條件。
完成後,點擊“新項目”。
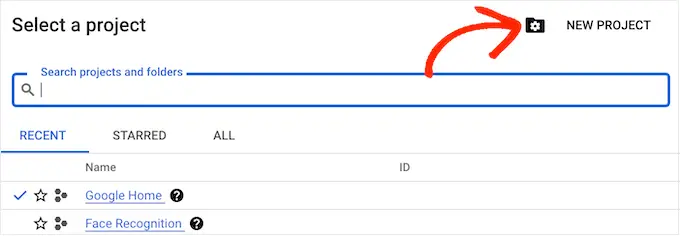
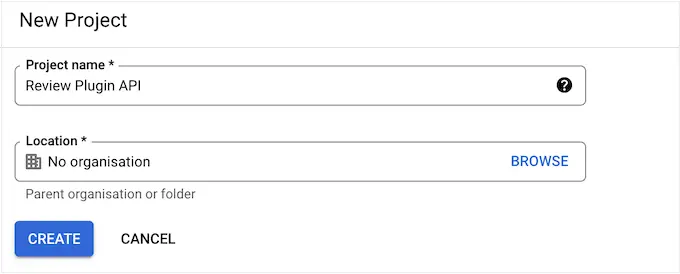
您現在可以輸入項目的名稱。 這僅供您參考,因此您可以使用任何您想要的東西。
完成後,單擊“創建”按鈕。
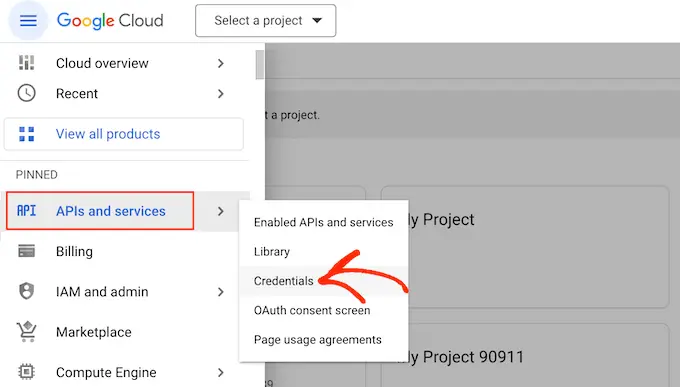
之後,單擊左上角的帶線圖標以打開菜單。
在菜單中,選擇“API 和服務”和“憑據”。
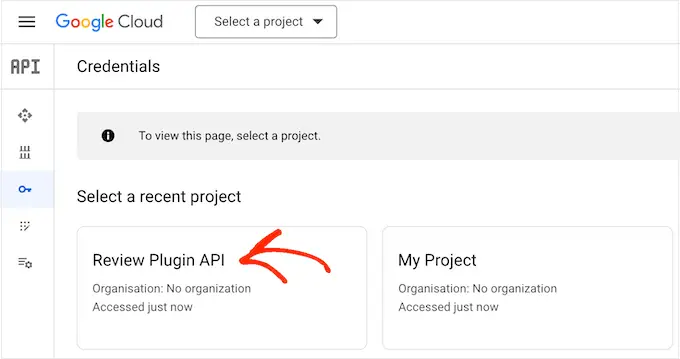
您現在將看到所有的 Google 項目。
只需找到我們剛剛創建的項目並單擊它即可。
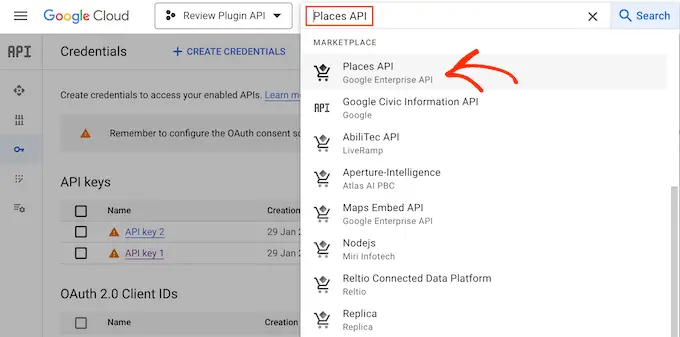
在搜索字段中,開始輸入“Places API”。
當出現正確的 API 時,單擊它。
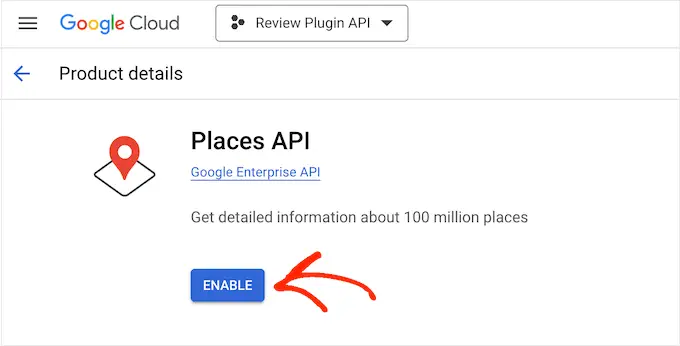
這會將您帶到一個屏幕,您可以在其中激活發出 Places API 請求的密鑰。
為此,只需單擊“啟用”按鈕。
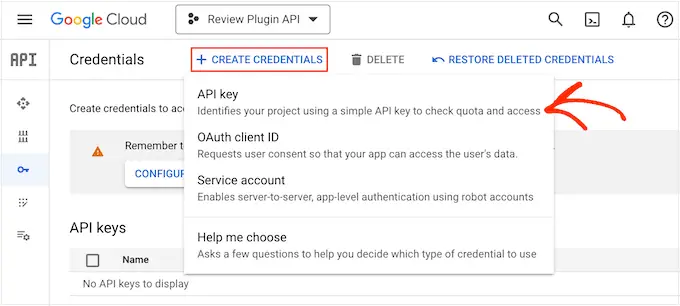
完成後,按向後箭頭返回到主 Google Cloud Console 儀表板。 在這裡,單擊“創建憑據”。
繼續並從下拉菜單中選擇“API 密鑰”。
片刻之後,您會看到“已創建 API 密鑰”彈出窗口。
您需要將此信息添加到您的 WordPress 博客或網站,因此請記下它。
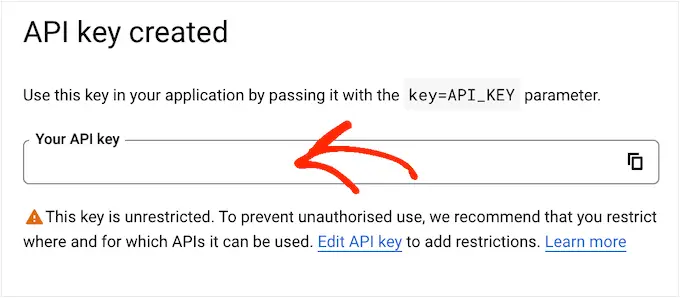
默認情況下,Google 的所有 API 密鑰都是不受限制的。 要阻止其他人使用 API 密鑰,您需要通過單擊彈出窗口中的“編輯 API 密鑰”鏈接來限制它。
這將打開一個顯示所有 Google API 密鑰的屏幕。 只需找到您剛剛創建的密鑰,然後單擊一下即可。
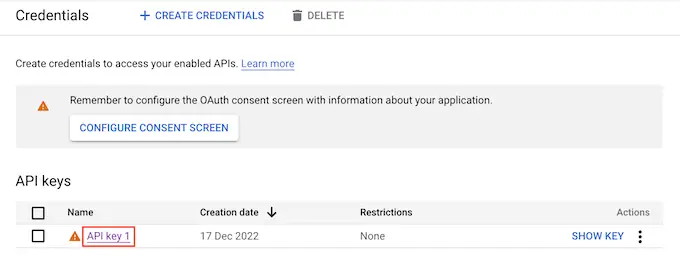
注意:如果您不小心關閉了彈出窗口,請不要擔心。 您可以通過在左側菜單中選擇“憑據”來訪問同一屏幕。
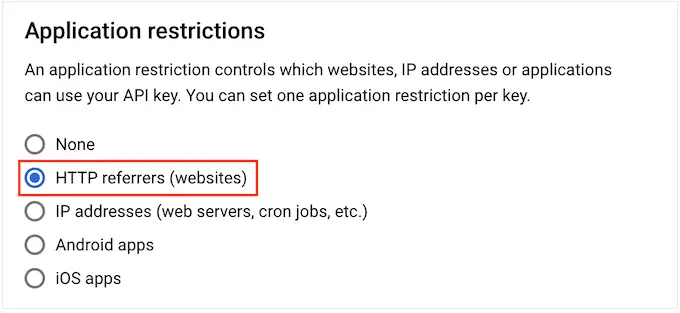
在“應用程序限制”下,單擊“HTTP 引薦來源網址(網站)”。
在“網站限制”下,點擊“添加”。
您現在可以輸入您的 WooCommerce 商店或 WordPress 網站的地址,然後單擊“完成”。
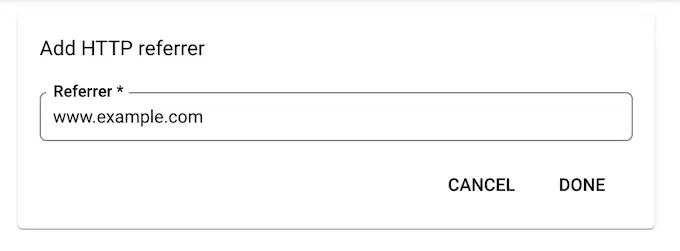
為確保 Smash Balloon 可以訪問 Places API,您還需要輸入 www.googleapis.com 並點擊“完成”。
在“API 限制”下,選擇“限制密鑰”旁邊的按鈕。
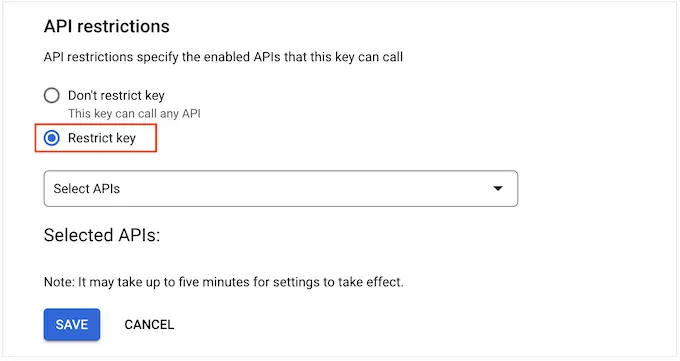
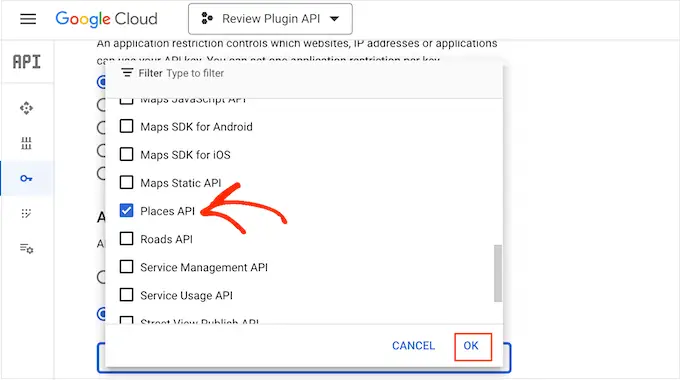
完成後,點擊“選擇 API”下拉菜單並選中“Google Places API”旁邊的框。
現在我們準備好點擊“確定”。
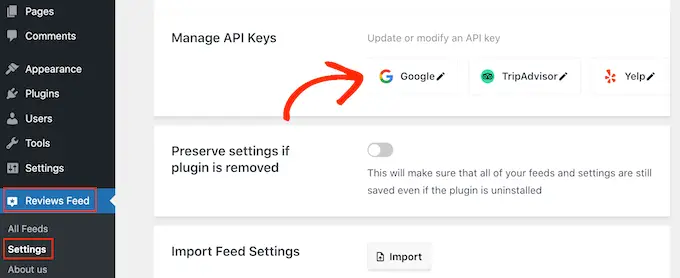
下一步是將 API 密鑰添加到您的站點。 在 WordPress 儀表板中,轉到Reviews Feed » Settings 。
在“管理 API 密鑰”下,點擊“Google”旁邊的鉛筆圖標。
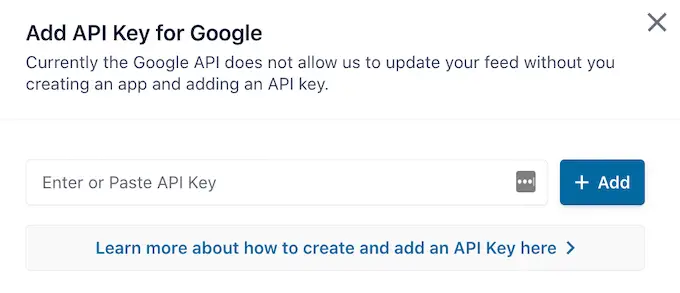
在彈出窗口中,添加您的 Google API 密鑰。
之後,單擊“添加”按鈕。
現在您已經添加了一個 API 密鑰,您已準備好創建一個顯示您所有 Google 評論的提要。
為此,請轉至評論提要 » 所有提要,然後單擊“添加新”按鈕。
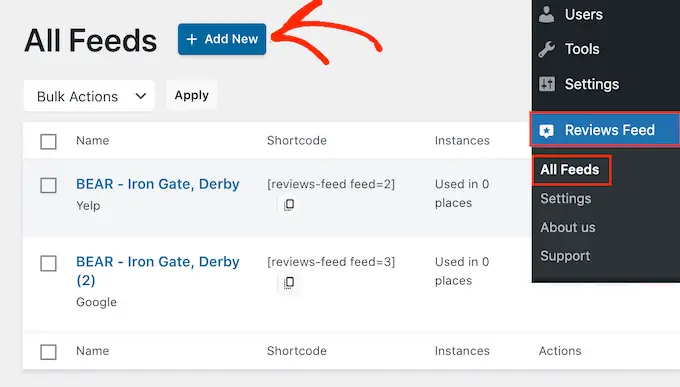
在下一個屏幕上,單擊“添加新項”。
在出現的彈出窗口中,點擊“Google”,然後選擇“下一步”。
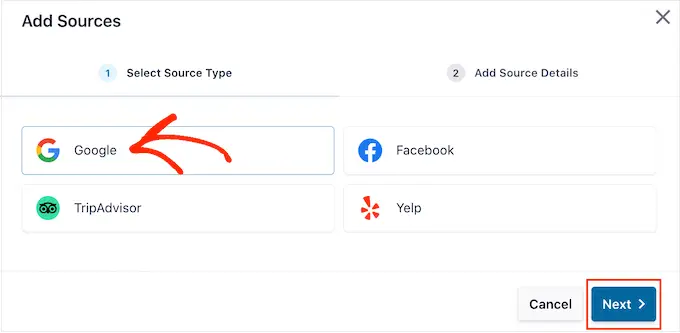
現在,您需要輸入要在 Feed 中使用的咖啡館、餐廳或其他地點的地點 ID。
要獲取 ID,請轉至 Google 的地點 ID 頁面並滾動至“查找特定地點的 ID”。

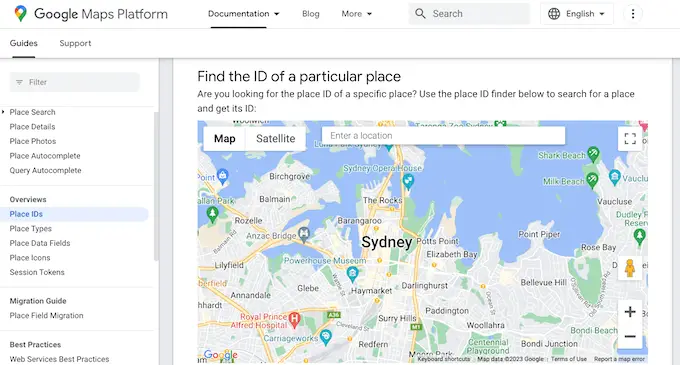
在 Google 地圖搜索欄中,開始輸入您要突出顯示的地點的地址或名稱。 當出現正確的位置時,點擊一下。
Google 現在將在一個小彈出窗口中顯示地點 ID。
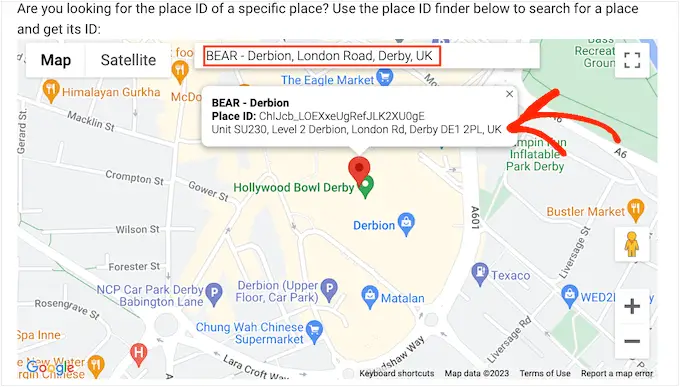
繼續並複制地點 ID。
現在,切換回 WordPress 儀表板並將 ID 粘貼到“輸入地點 ID”字段中。
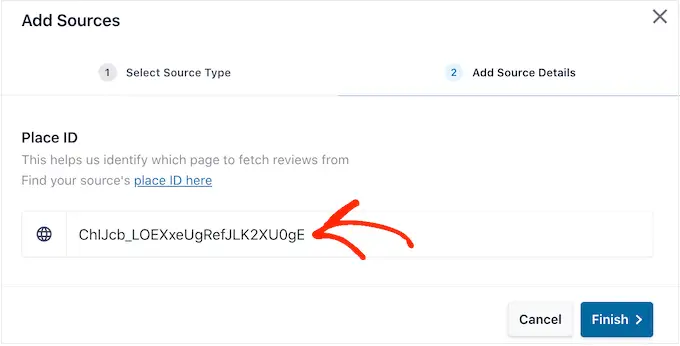
完成後,點擊“完成”。
要繼續創建提要,您需要選中剛剛添加的 Google 地點旁邊的複選框,然後點擊“下一步”。

您現在可以選擇要用於評論提要的模板,然後單擊“下一步”。
Smash Balloon 現在將創建一個 Feed,顯示您所有的 Google 評論。
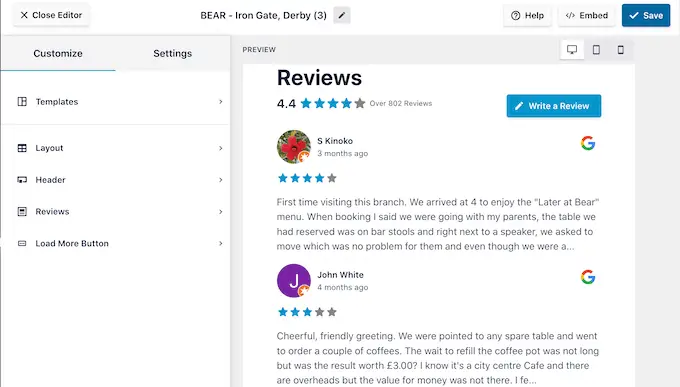
您要更改提要的外觀嗎? 跳至本文末尾,了解有關如何微調 Google 評論提要的詳細步驟指南,然後將其添加到您的網站。
方法 3.如何在 WordPress 中顯示 Facebook 評論
許多企業、網站和在線商店都使用 Facebook 與他們的受眾建立聯繫。 Facebook 也有自己的內置評論系統,因此您可能希望將這些評論添加到您的網站。
與 Yelp 和 Google 不同,您的 Facebook 頁面屬於您,因此這也是一種宣傳您的個人資料並獲得更多社交媒體關注者的方式。
要創建 Facebook 評論提要,請轉至評論提要 » 所有提要。
然後,單擊“添加新”按鈕。
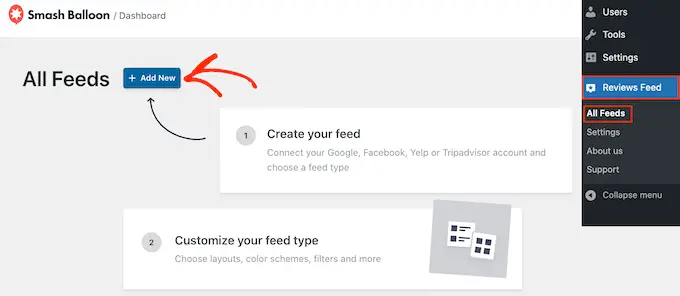
在下一個屏幕上,再次單擊“添加新”。
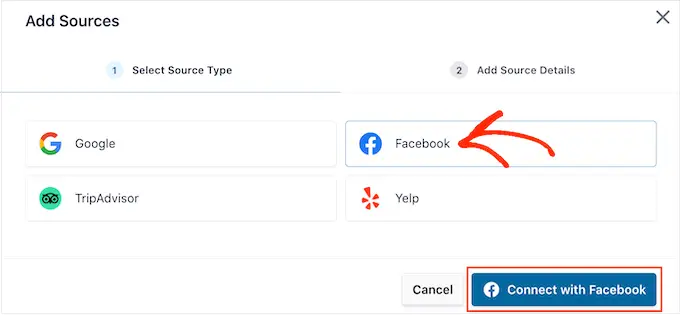
在出現的彈出窗口中,點擊“Facebook”,然後選擇“連接 Facebook”。
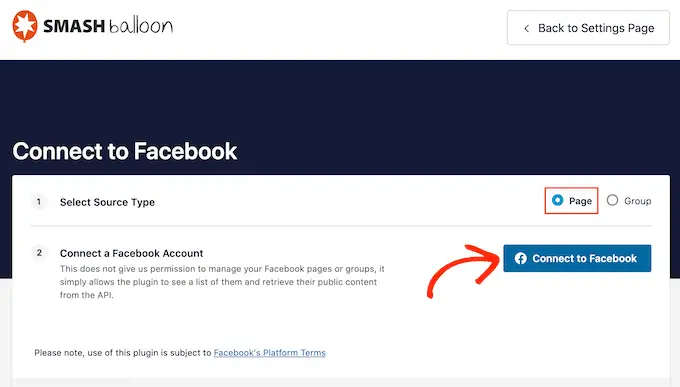
在下一個屏幕上,選擇“頁面”旁邊的單選按鈕。
完成後,點擊“連接到 Facebook”。
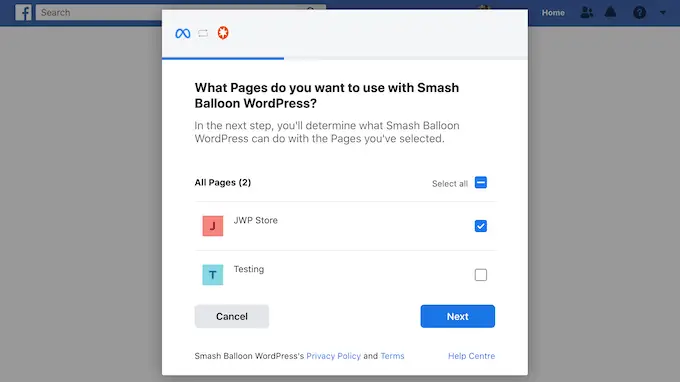
這將打開一個彈出窗口,您可以在其中登錄您的 Facebook 帳戶並選擇您將從中獲取評論的頁面。
在那之後,我們準備好點擊“下一步”。
Facebook 現在將顯示 Smash Balloon 可以訪問的所有信息以及它可以執行的操作。
要限制 Smash Balloon 訪問您的 Facebook 頁面,只需單擊任何開關將其從“是”變為“否”。 但是,請注意,這可能會影響您網站上顯示的內容。
考慮到這一點,最好啟用所有開關。
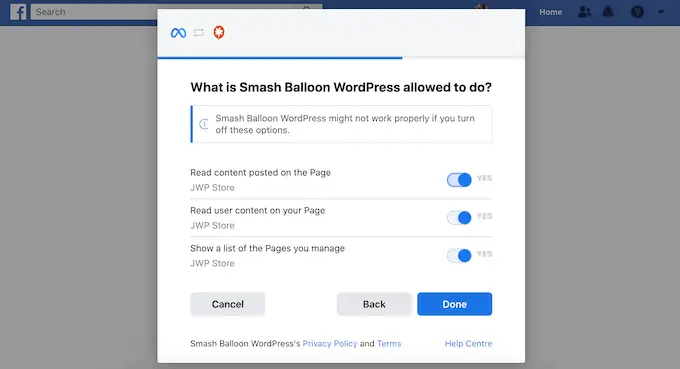
如果您對 Facebook 權限的設置方式感到滿意,請單擊“完成”。
片刻之後,您應該會看到一條消息,確認您已連接 WordPress 網站和 Facebook 頁面。
完成後,單擊“確定”按鈕。
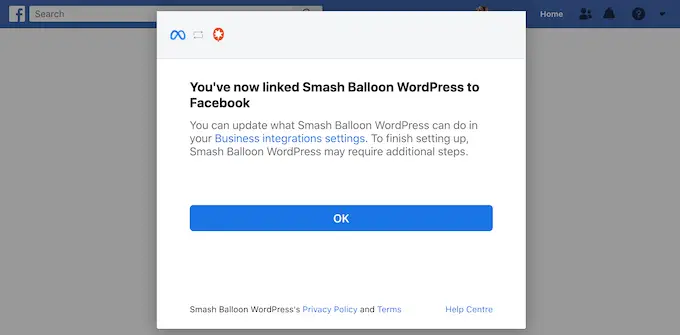
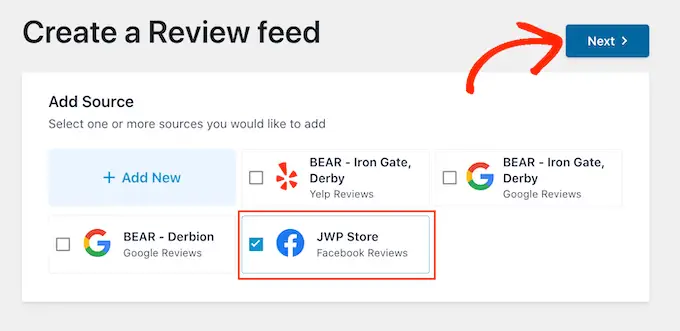
Smash Balloon 會自動將您帶回 WordPress 儀表板,您會在其中看到剛剛連接到您網站的 Facebook 頁面。
只需選中 Facebook 頁面旁邊的複選框,然後單擊“下一步”按鈕。
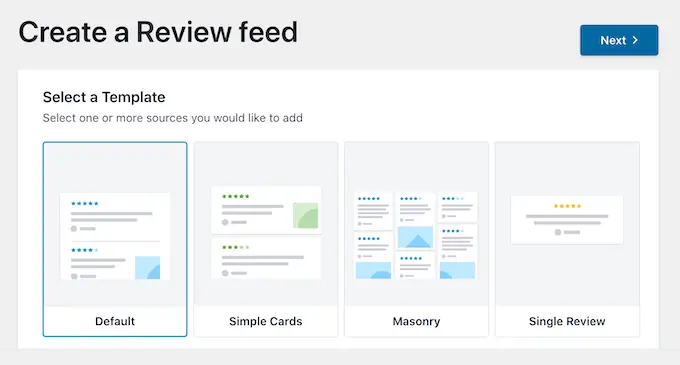
您現在可以選擇要用於 Facebook 評論提要的模板。
做出決定後,點擊“下一步”。
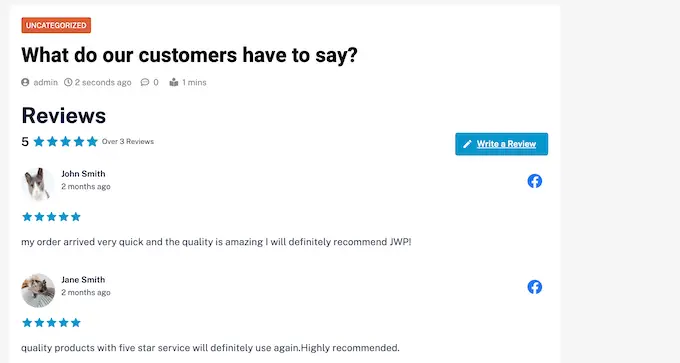
Smash Balloon 現在將創建一個顯示您所有 Facebook 評論的提要。
自定義您的 Google、Facebook 或 Yelp 評論提要
Smash Balloon 會自動複製您的 WordPress 主題,因此您創建的任何評論提要都將與您網站的設計完美契合。 但是,Smash Balloon 也有一個高級的提要編輯器,因此您可以微調提要的每個部分。
無論您是使用 Google、Facebook 還是 Yelp 創建提要,Smash Balloon 都會自動打開其提要編輯器。
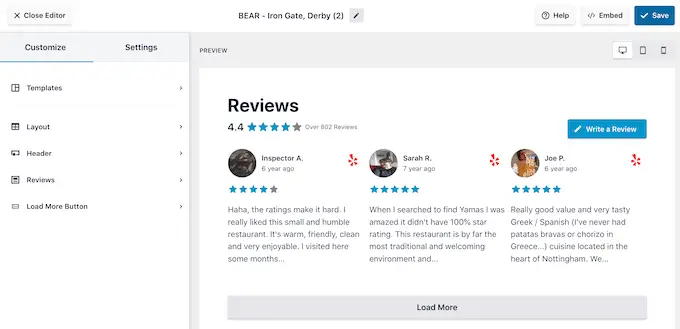
注意:如果您不小心關閉了編輯器,請不要驚慌。 只需轉到 WordPress 儀表板中的評論提要 » 所有提要,然後單擊提要旁邊的“編輯”圖標。
Smash Balloon 會在右側顯示您的評論提要的實時預覽。 左側是一個菜單,其中顯示了可用於更改提要外觀的不同設置。
要查看您可以進行哪些更改,請先單擊左側菜單中的“佈局”。 在這裡,您可以選擇 Grid、Masonry 或 Carousel 佈局。
當您單擊不同的佈局時,實時預覽將自動更新以顯示新佈局。 這樣可以輕鬆嘗試不同的佈局並找到您喜歡的佈局。
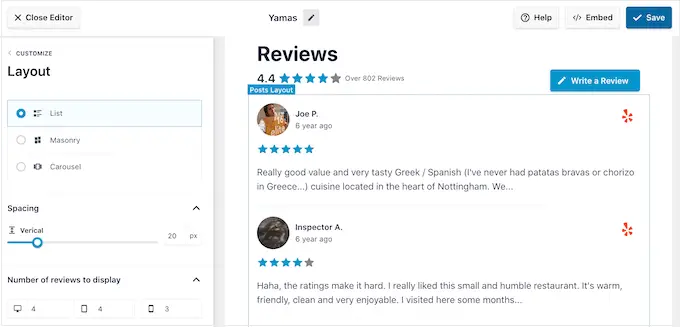
您還可以更改間距、提要中包含的評論數量,以及 WordPress 從每條評論中顯示的字符數。
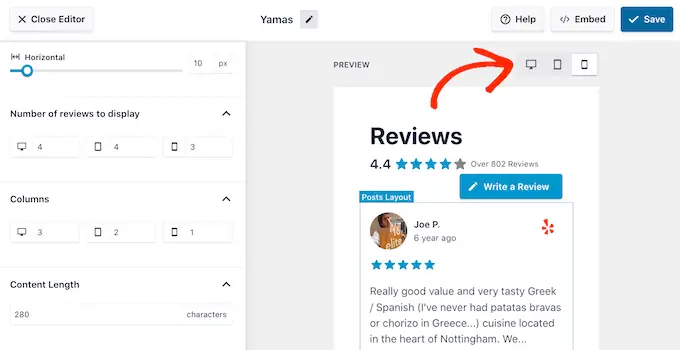
當您進行更改時,請記住,與台式電腦相比,智能手機和平板電腦上的提要可能看起來有所不同。
話雖如此,最好使用右上角的一排按鈕來測試 Feed 的移動版本。 通過這種方式,您可以創建在智能手機和平板電腦上看起來與在台式計算機上一樣出色的評論提要。
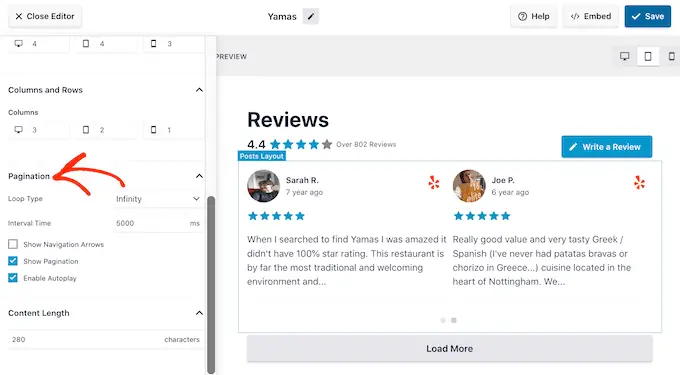
最後,如果您選擇輪播佈局,則可以使用“分頁”設置更改評論的滾動方式。
例如,您可以啟用自動播放以便評論自動滾動或增加間隔以便訪問者有更多時間閱讀每條評論。
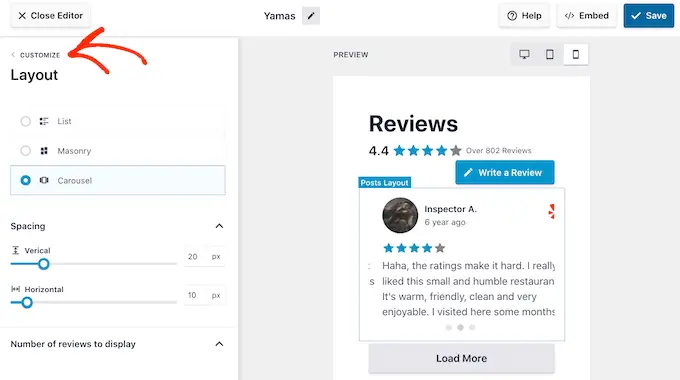
如果您對這些更改感到滿意,請點擊“自定義”旁邊的小箭頭。
這會將您帶回到主要的 Smash Balloon 評論提要編輯器。
您可以探索的下一個設置是“頁眉”,它控制顯示在提要頂部的文本。
默認情況下,Smash Balloon 會顯示“評論”標題、您的平均星級和“寫評論”按鈕。
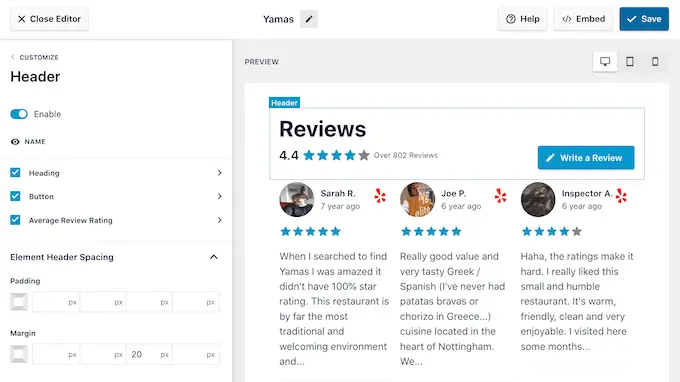
此標頭可幫助訪問者了解內容,同時也鼓勵他們留下自己的評論。 但是,如果您願意,則可以使用“啟用”開關刪除標題。
如果您確實顯示標題,則可以使用標題、按鈕和平均評論評級複選框添加或刪除內容。
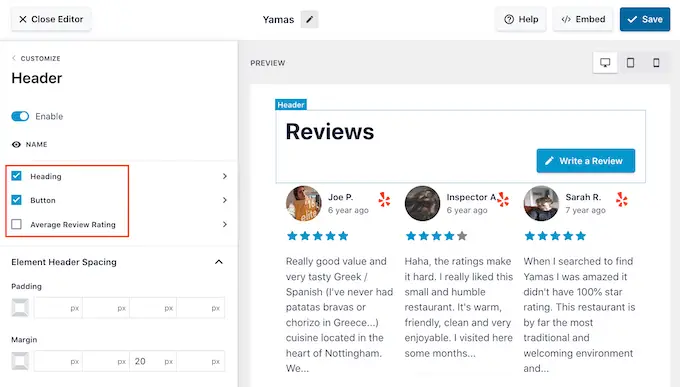
要更改填充和邊距,只需使用“元素標題間距”下的設置即可。
如果您想更改標題中顯示的任何文本,只需單擊標題、按鈕或平均評論評級。 這會將您帶到一個區域,您可以在其中更改文本顏色、大小等。
您還可以通過在“內容”字段中鍵入您自己的自定義消息來替換標准文本。
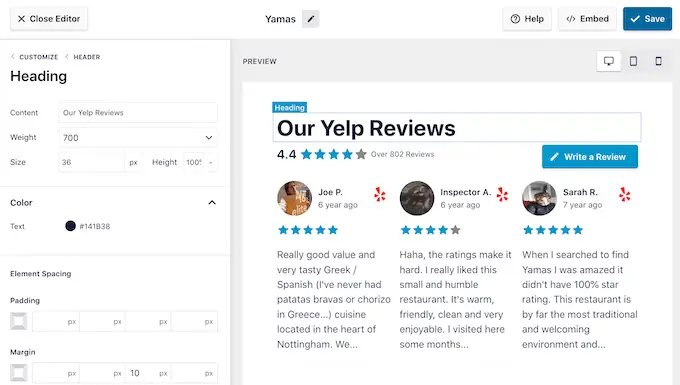
當您準備好返回主編輯器屏幕時,只需單擊左側菜單頂部的“自定義”鏈接。
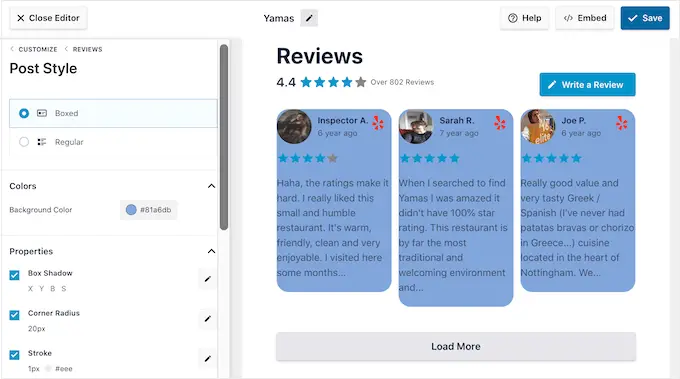
您可以查看的下一個設置是“評論”,因此請點擊此選項。 在這裡,您可以在“發布樣式”和“編輯單個元素”之間進行選擇。
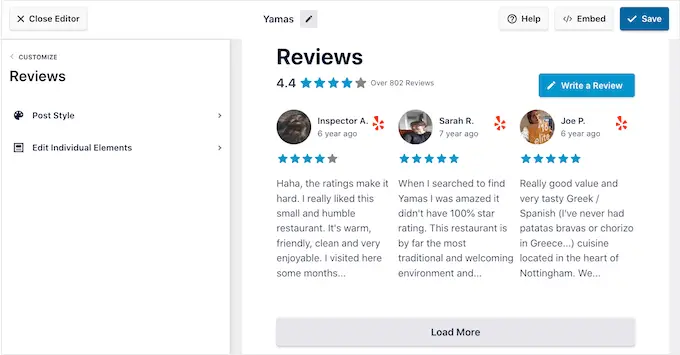
如果您選擇“帖子樣式”,那麼您可以更改單個評論在 Feed 中的顯示方式。 例如,您可以切換到盒裝佈局、添加陰影並更改角半徑以創建彎曲的邊緣。
當您進行更改時,預覽會自動更新,因此您可以嘗試不同的設置來查看您網站上的最佳效果。
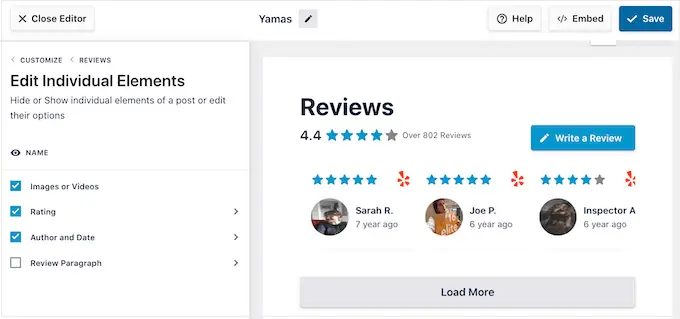
如果您選擇“編輯單個元素”,那麼您將看到 Reviews Feed Pro 包含在每條評論中的所有不同內容,例如評級、作者和日期以及評論文本。
要刪除一段內容,只需單擊以取消選中它的框。
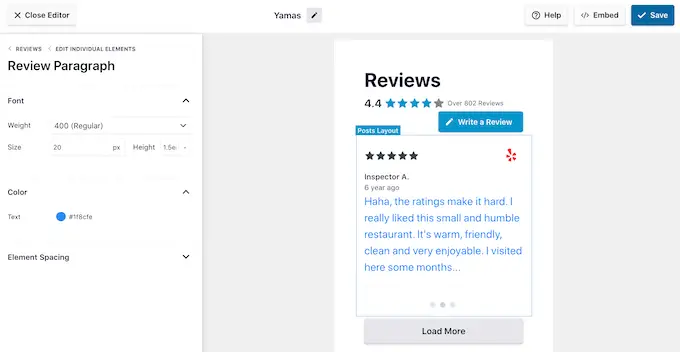
您還可以通過單擊來自定義每種類型的內容的外觀。
例如,在下圖中,我們更改了評論內容的顏色和大小,稱為“評論段落”。
如果您對評論提要的外觀感到滿意,請單擊“自定義”返回主 Smash Balloon 編輯器。
您現在可以通過選擇“加載更多按鈕”進入下一個設置屏幕。
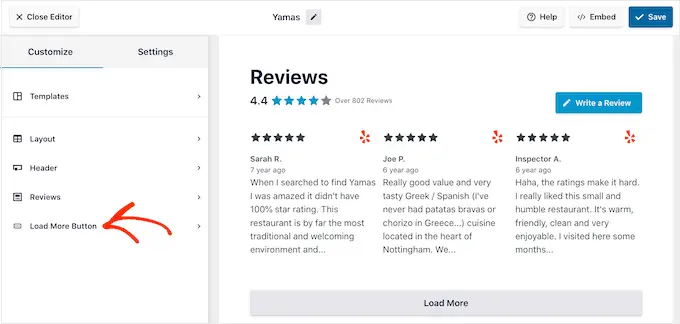
“加載更多”按鈕允許訪問者滾動瀏覽更多評論,因此插件默認添加它。 由於它是一個如此重要的按鈕,您可能希望通過更改背景顏色、懸停狀態、標籤、邊距等來幫助它脫穎而出。
您還可以通過在“文本”字段中鍵入您自己的消息來替換默認的“加載更多”文本。
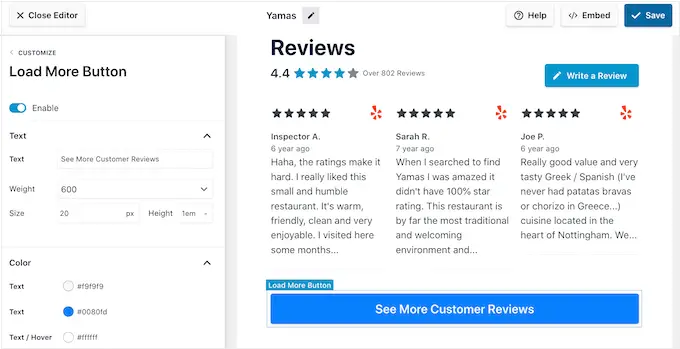
如果您願意,則可以通過單擊“啟用”開關來完全刪除該按鈕。
如果您對評論提要的外觀感到滿意,請不要忘記點擊“保存”。 完成這些後,您就可以將 Google、Facebook 或 Yelp 評論添加到您的網站了。
如何在您的 WordPress 網站上添加評論
現在,您可以使用塊、小部件或簡碼將評論提要添加到您的站點。
如果您使用 Reviews Feed Pro 創建了多個提要,那麼如果您要使用小部件或塊,則需要知道提要的短代碼。
要獲取此信息,請轉至評論提要 » 所有提要,然後查看“簡碼”下的值。 您需要將此代碼添加到塊或小部件中,因此請記下它。
在下圖中,我們需要使用 [reviews-feed feed=2]
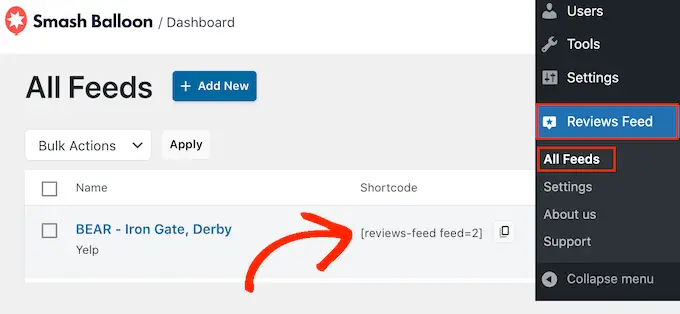
如果您想將提要嵌入頁面或帖子中,則可以使用評論提要塊。
只需打開要顯示 Yelp、Google 或 Facebook 評論的頁面或帖子。 然後,單擊“+”圖標以添加新塊並開始輸入“評論提要”。
當出現正確的塊時,單擊以將其添加到頁面或帖子中。
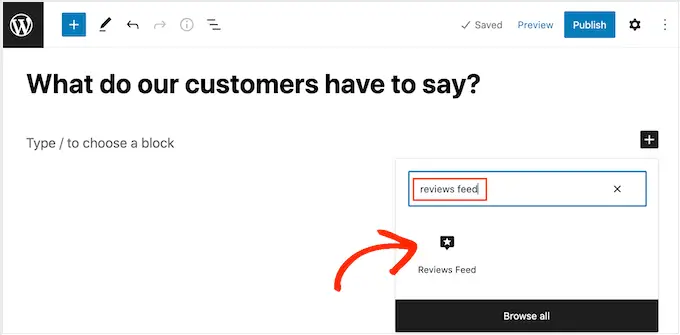
默認情況下,該塊將顯示您的評論提要之一。 如果您想顯示不同的提要,請在右側菜單中找到“簡碼設置”。
在這裡,只需添加您之前獲得的短代碼,然後單擊“應用更改”。
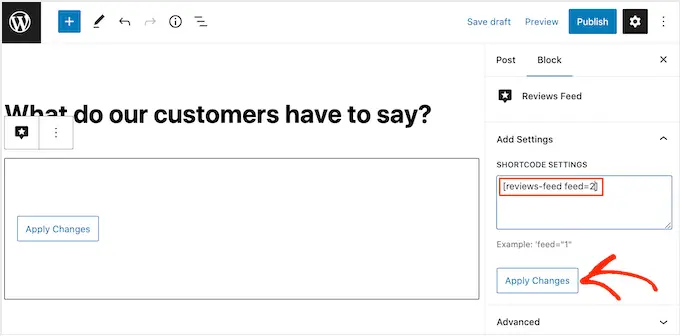
如果您對評論提要的外觀感到滿意,那麼您可以繼續發布或更新頁面。
另一種選擇是將評論提要小部件添加到您的網站。 這是在您網站的每個頁面上顯示正面客戶評論的好方法。 例如,您可以將小部件添加到側邊欄或 WordPress 頁腳。
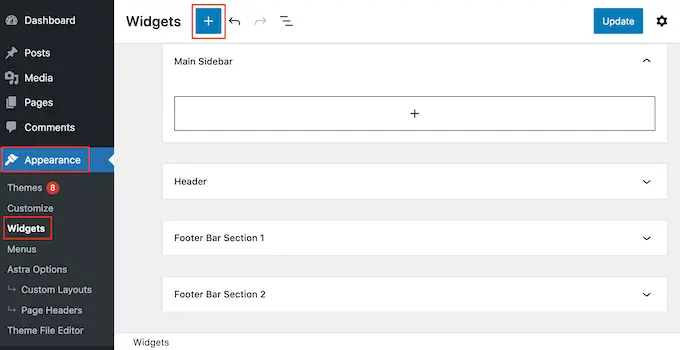
要將評論提要小部件添加到您的站點,請轉到外觀 » 小部件。 然後,您可以單擊屏幕頂部的藍色“+”圖標。
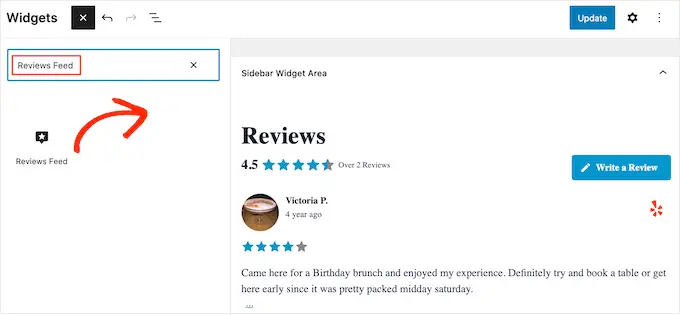
在出現的面板中,輸入“評論提要”以找到正確的小部件。
然後,只需將小部件拖到要顯示評論的區域,例如側邊欄或類似部分。
該小部件將自動顯示您使用評論提要插件創建的提要之一。 如果這不是您要顯示的提要,請將提要的簡碼輸入“簡碼設置”框中。
之後,點擊“應用更改”。
您現在可以通過單擊“更新”按鈕使小部件生效。 有關更多信息,請參閱我們關於如何在 WordPress 中添加和使用小部件的分步指南。
另一種選擇是使用短代碼將 Google、Facebook 或 Yelp 評論嵌入到任何頁面、帖子或小部件就緒區域。
只需轉到Reviews Feed » All Feeds並複制“簡碼”列中的代碼。 您現在可以將此代碼添加到任何簡碼塊中。
如需有關放置簡碼的幫助,請參閱我們關於如何添加簡碼的指南。
您使用的是啟用塊的主題嗎? 然後,您可以使用全站編輯器在您網站的任何位置添加評論提要塊。
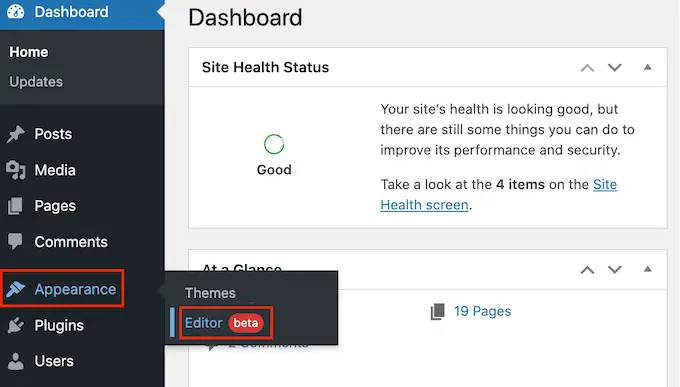
在 WordPress 儀表板中,轉到外觀 » 編輯器。
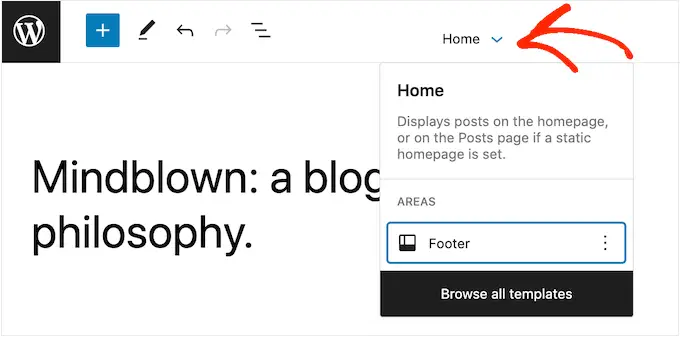
默認情況下,全站點編輯器將顯示主題的主頁模板。 如果您想將 Google、Facebook 或 Yelp 提要添加到不同的模板,請單擊“主頁”旁邊的箭頭。
然後您可以從下拉列表中選擇任何設計,例如頁腳模板。
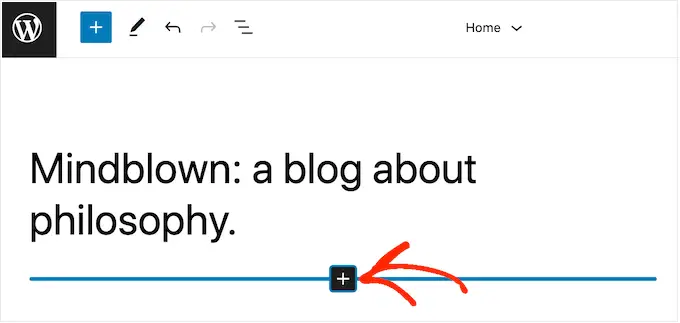
選擇模板後,只需將鼠標懸停在要顯示評論的區域上即可。
然後,單擊“+”按鈕。
完成後,輸入“評論提要”。
當出現正確的塊時,單擊以將其添加到模板中。
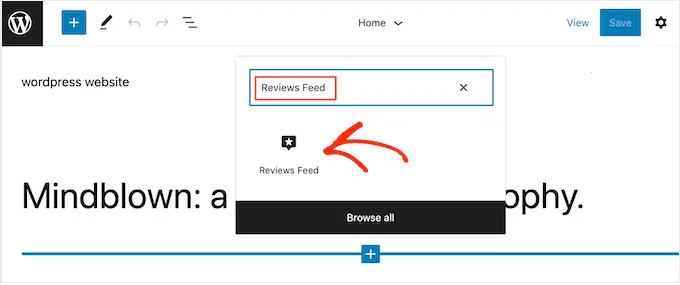
與往常一樣,評論提要默認顯示提要。 您可以按照上述相同過程添加短代碼來更改此提要。
我們希望本文能幫助您了解如何在 WordPress 中顯示 Google、Facebook 和 Yelp 評論。 您還可以閱讀我們的指南,了解適用於小型企業的最佳電子郵件營銷服務以及如何創建電子郵件通訊。
如果您喜歡這篇文章,請訂閱我們的 YouTube 頻道以獲取 WordPress 視頻教程。 您還可以在 Twitter 和 Facebook 上找到我們。
