如何使用網格佈局來顯示您的 WordPress 帖子
已發表: 2022-08-30您希望以網格格式顯示您的 WordPress 帖子嗎?
在 WordPress 中呈現您的內容時,網格佈局為您提供了額外的選項。 這在設計自定義頁面時可能會派上用場。 在本文中,我們將教您如何在您網站的任何位置以網格樣式快速顯示您的 WordPress 帖子。
什麼時候需要 WordPress 網格佈局?
每個 WordPress 主題都支持經典的垂直博客文章風格,適用於大多數網站。 但是,這種樣式可能會佔用大量空間,尤其是在您有很多文章的情況下。 如果您正在為您的博客製作自定義主頁,您可能希望利用網格樣式來展示您最近的內容。
這將允許您向主頁添加更多內容。 此外,您的帖子網格將突出您的特色照片,使它們更具美感和可點擊性。 帖子網格也可用於展示您的創意作品集和其他形式的獨特材料。
使用塊編輯器,創建 WordPress 後網格佈局。
使用 WordPress 塊編輯器,您可以輕鬆地在帖子網格排列中顯示您的帖子和縮略圖。 您可以使用內置的後網格塊構建自己的網格。
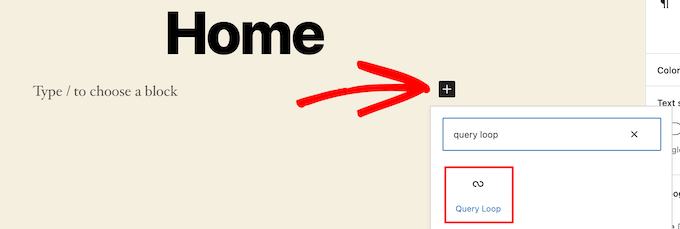
打開您要更改的頁面,然後單擊“加號”添加塊按鈕,搜索“查詢循環”,然後單擊塊以添加它。

此塊將您的帖子循環合併到您的頁面中。
然後,在塊的頂部,選擇“開始空白”以創建後網格。

根據您希望在帖子網格中顯示的信息類型,您有幾個選項。
我們將使用“圖像、日期和標題”,但您可以隨心所欲。

然後,將鼠標懸停在圖像上並選擇“網格視圖”選項。
這會將您的列表轉換為帖子網格。

然後可以自定義顯示的信息。
首先,我們將刪除塊底部的分頁。 只需單擊它並選擇“三點”選項菜單。
然後,選擇“刪除分頁”。

這將自動從塊中刪除元素。
同樣,您可以從帖子中刪除日期或為您的讀者留下額外的帖子信息。
之後,我們將添加指向帖子縮略圖和帖子標題的鏈接。
只需單擊帖子的縮略圖,然後在右側選項框中切換“鏈接到帖子”即可。

然後,對於您的帖子標題,重複該過程。
完成後,單擊“更新”或“發布”按鈕發布您的帖子網格。
您現在可以通過訪問您的 WordPress 網站來查看新的 WordPress 帖子網格。

然後,對於您的帖子標題,重複該過程。 完成後,單擊“更新”或“發布”按鈕發布您的帖子網格。 您現在可以通過訪問您的 WordPress 網站來查看新的 WordPress 帖子網格。
通過向 WordPress 添加代碼,您可以創建 WordPress 後網格佈局。
這種方法需要基本掌握如何將代碼插入 WordPress。 在開始添加代碼之前,您必須首先為您的帖子網格建立一個新的圖像大小。
接下來,找到要添加代碼片段的 WordPress 主題文件。 例如,您可以將它包含在您的 single.php 文件中,以便它顯示在您所有文章的底部。 您還可以製作自己的頁面模板來顯示帶有縮略圖的博客文章網格佈局。
之後,您可以開始向 WordPress 添加代碼。 我們將逐節分解代碼示例,因為它很長。 首先,將以下代碼片段插入到您的主題模板文件中。
<?php $counter = 1; //start counter $grids = 2; //Grids per row global $query_string; //Need this to make pagination work /*Setting up our custom query (In here we are setting it to show 12 posts per page and eliminate all sticky posts*/ query_posts($query_string . '&caller_get_posts=1&posts_per_page=12'); if(have_posts()) : while(have_posts()) : the_post(); ?>在此代碼行中設置了後循環查詢。 如果您願意,您可以更改“每頁帖子”變量以在每頁顯示更多帖子。
然後,在您的主題模板文件中,粘貼以下代碼片段。
<?php //Show the left hand side column if($counter == 1) : ?> <div class="griditemleft"> <div class="postimage"> <a href="<?php the_permalink(); ?>" title="<?php the_title_attribute(); ?>"><?php the_post_thumbnail('category-thumbnail'); ?></a> </div> <h2><a href="<?php the_permalink(); ?>" title="<?php the_title_attribute(); ?>"><?php the_title(); ?></a></h2> </div> <?php //Show the right hand side column elseif($counter == $grids) : ?> <div class="griditemright"> <div class="postimage"> <a href="<?php the_permalink(); ?>" title="<?php the_title_attribute(); ?>"><?php the_post_thumbnail('category-thumbnail'); ?></a> </div> <h2><a href="<?php the_permalink(); ?>" title="<?php the_title_attribute(); ?>"><?php the_title(); ?></a></h2> </div> <div class="clear"></div> <?php $counter = 0; endif; ?>此代碼行為我們的文章生成兩列,顯示文章標題和圖片。 它還會生成一個 CSS 類,稍後我們將對其進行樣式設置。 它還指“發布圖像”,它必須替換為您之前製作的圖像尺寸的名稱。

然後,最後,添加以下代碼片段。
<?php $counter++; endwhile; //Post Navigation code goes here endif; ?>這段代碼只是關閉了循環。 它還允許您添加帖子導航,但由於大多數網站所有者為此使用不同的插件,我們沒有包含它以避免代碼衝突。
以下是整個代碼片段的顯示方式。
<div> <?php $counter = 1; //start counter $grids = 2; //Grids per row global $query_string; //Need this to make pagination work /*Setting up our custom query (In here we are setting it to show 12 posts per page and eliminate all sticky posts) */ query_posts($query_string . '&caller_get_posts=1&posts_per_page=12'); if(have_posts()) : while(have_posts()) : the_post(); ?> <?php //Show the left hand side column if($counter == 1) : ?> <div class="griditemleft"> <div class="postimage"> <a href="<?php the_permalink(); ?>" title="<?php the_title_attribute(); ?>"><?php the_post_thumbnail('category-thumbnail'); ?></a> </div> <h2><a href="<?php the_permalink(); ?>" title="<?php the_title_attribute(); ?>"><?php the_title(); ?></a></h2> </div> <?php //Show the right hand side column elseif($counter == $grids) : ?> <div class="griditemright"> <div class="postimage"> <a href="<?php the_permalink(); ?>" title="<?php the_title_attribute(); ?>"><?php the_post_thumbnail('category-thumbnail'); ?></a> </div> <h2><a href="<?php the_permalink(); ?>" title="<?php the_title_attribute(); ?>"><?php the_title(); ?></a></h2> </div> <div class="clear"></div> <?php $counter = 0; endif; ?> <?php $counter++; endwhile; //Pagination can go here if you want it. endif; ?> </div>為了確保您的帖子網格正確顯示,請將以下 CSS 添加到您的網站。
#gridcontainer{ margin: 20px 0; width: 100%; } #gridcontainer h2 a{ color: #77787a; font-size: 13px; } #gridcontainer .griditemleft{ float: left; width: 278px; margin: 0 40px 40px 0; } #gridcontainer .griditemright{ float: left; width: 278px; } #gridcontainer .postimage{ margin: 0 0 10px 0; }通過實驗探索各種 CSS 選擇器對 post 循環的不同組件的影響。
我們希望這篇文章對教您如何以網格樣式顯示您的 WordPress 帖子有用。
